

Philippines domestic flights often feel hardest before the plane even moves.
The stress usually comes from small decisions that stack up fast: whether to pay for a checked bag, how much airport buffer is enough, whether the terminal details are saved offline, and what happens to a van, ferry, or hotel check-in if the flight slips. This guide is built for the day before and the day of travel, with calm, practical habits that help the whole trip feel more manageable.
At a Glance
For most normal travel days, the goal is simple: be inside the terminal around two hours before departure if you already checked in online, have no checked bag, and are not traveling through a congestion-prone terminal.
Add more buffer when the route is weather-sensitive, the airport road is unpredictable, or your booking still needs counter work. Budget-wise, carry-on only can keep extra costs low, while checked baggage, ride-hailing, and snack or charging backups can quietly add a few hundred pesos or more to the day.
Crowd risk is usually higher on Friday afternoons, very early departures, Sunday returns, school breaks, long weekends, and days with rain bands moving through Metro Manila or island gateways.
A good rain or heat backup is not glamorous: screenshot everything, charge fully, wear breathable layers, and keep one personal item packed like a mini survival kit. Reality Check: the smoothest airport days rarely come from luck. They come from removing one or two avoidable problems before leaving home.
Why Philippines domestic flights feel stressful before takeoff
The pressure around a domestic flight in the Philippines is rarely about the actual flight time.
It is the friction around it: traffic on the way to the airport, a bag that suddenly looks too heavy, a weak signal when the app refuses to load, or an onward transfer that only works if the flight lands roughly on schedule. Weather can also change the mood of a travel day quickly. Even when the delay is not dramatic, uncertainty can spread from the terminal to every booking after it.
The three choices that change the whole day: baggage, timing, and offline backups
Three choices do most of the heavy lifting. First, decide whether you are really doing carry-on only or whether checked baggage will make the day easier. Second, set a realistic airport arrival target based on your terminal, bag situation, and weather.
Third, save the details that matter offline before you step out the door. Reality Check: many “airport disasters” are just a chain of ordinary inconveniences. Break that chain early, and the day feels far less intense.
Baggage basics that actually matter
 For local flights, baggage rules matter less as theory and more as timing, cost, and friction.
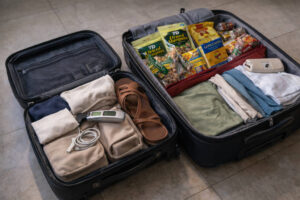
A bag that works beautifully for a road trip can become expensive at the airport if it is too heavy, too bulky, or packed without thinking about liquids, gadgets, and items that cannot be surrendered at the last minute. The most useful question is not only “Can this fit?” but “Will this setup still be easy if there is a queue, a transfer, or a surprise gate move?”
What “hand-carry only” usually looks like on Philippine domestic flights
Hand-carry only usually works best as one compact cabin bag plus one small personal item that can stay under the seat. The winning version is not the most stylish one; it is the one you can lift, roll, and reorganize quickly.
For short city breaks or one-base trips, carry-on only saves time at bag drop, avoids waiting at baggage claim, and reduces the chance of paying airport-rate add-ons. It also helps when your landing plan is tight and you want to move straight to a taxi line, hotel shuttle, or public transport.
What matters most is checking your airline’s current size and weight limits before packing, not after arriving. Rules can differ by carrier and fare type, and the mistake many travelers make is assuming one previous trip applies to the next one too. Keep chargers, batteries, gadgets, IDs, medicines, and one clean shirt or light layer with you, not buried in a larger bag.
When checked baggage is worth the extra cost
Checked baggage is worth paying for when it reduces stress more than it increases cost. That is often true for island trips with beachwear and extra shoes, family travel with shared items, longer stays, bulky work gear, or return legs that are likely to include pasalubong.
A checked bag can also be the calmer option when you know you will be tempted to gamble on hand-carry weight and spend the day worrying about it. Buying baggage in advance is usually the more sensible move than hoping the airport counter will be forgiving.
Checked baggage also changes your timing. It means more buffer at departure and more patience after landing. That tradeoff can still be worth it if it lets your personal item stay light and essential. Reality Check: the cheapest baggage decision is not always the least expensive overall. One surprise fee, one stressful repack at the counter, or one missed transfer can wipe out the savings fast.
The mistakes that usually trigger surprise baggage fees
The common fee triggers are familiar: weighing the bag at home without accounting for pasalubong added later, forgetting that a personal item still has to be truly small, bringing sharp tools or restricted items that force a surrender, and assuming all hand-carry rules are flexible if the line is long.
Another classic mistake is packing all the heavy items into one cabin bag instead of distributing them sensibly. Oversized boxes, sports gear, and food containers can also create problems even when the trip feels “domestic and simple.”
A good rule is this: if you would be embarrassed or rushed while unpacking the bag in public, the bag is too close to the limit. Repack the night before, weigh again, and make one final decision before sleeping.
How early to arrive for Philippines domestic flights
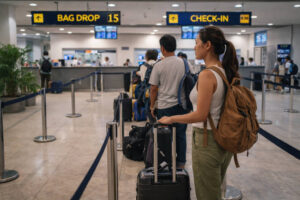 For most domestic flights on a normal day, two hours before departure is a realistic arrival target if all of the following are true: you checked in online, your boarding pass is accessible, you only have hand-carry, your valid ID is ready, and you are using an airport and terminal that you already understand.
That is usually enough time for security, a comfort break, and a little space for a moderate queue without turning the trip into an all-day vigil.
A realistic rule for normal domestic travel days
Use two hours as your inside-the-terminal target, not your leave-home time. In Philippine cities, the harder variable is often the road to the airport, not the terminal itself. Build your departure from home or hotel backward from the moment you want to be standing inside. It helps to decide in advance what “late” means for you. For many travelers, arriving ninety minutes before departure with no checked bag is already a tense day, even if it still works.
When to add more buffer for NAIA, bad weather, checked bags, or peak crowds
Add more buffer when you are flying from NAIA, checking a bag, traveling with children or older relatives, dealing with rain, or flying near long weekends and school breaks. Three hours is not excessive when terminal traffic, bag drop, or road congestion can each steal time. If your flight is the first anchor of a longer chain, like a ferry departure or a van seat that cannot easily be moved, the extra buffer is even smarter.
Reality Check: arriving too early can feel dull, but arriving slightly late can turn every small delay into panic. A quiet coffee in the terminal is usually cheaper than the cost of rushing the whole day.
What to screenshot and keep offline before you leave home
 Offline backups are one of the simplest upgrades for a local flight day. They matter most at the exact moment when signal gets weak, your battery drops, or the app logs you out. Saving the right files the night before turns your phone into a travel folder instead of a guessing game.
The must-save set: booking reference, itinerary, baggage rules, payment proof, terminal, and hotel or transfer details
Screenshot your booking reference, full itinerary, passenger names, baggage allowance, payment proof, check-in status, boarding pass screenshot, terminal details, hotel booking, driver contact, and any onward ferry, van, or tour confirmation.
Save a copy of your valid ID in a secure folder too, alongside emergency contacts and the airline customer support channel you are most likely to use. If you booked baggage or seat selection separately, keep that proof where it can be found in seconds.
The point is not to create a digital scrapbook. It is to remove the need to search for emails under pressure. When a staff member asks for a reference number, a terminal, or proof of payment, speed matters.
A simple phone folder setup that still works with weak signal
Create one album or folder named with the travel date and destination. Put your screenshots in the order you are likely to need them: booking, boarding pass, baggage, ID copy, terminal map if available, hotel, transfer, and return flight.
Mark it as a favorite or pin it. Then keep the most critical two or three images in your main camera roll as well, just in case. A small printed copy of the itinerary is still useful for travelers who share one booking across several family members.
Reality Check: the best screenshot folder feels unnecessary on a perfect day. That is exactly why it is valuable. You build it for the moment when the signal is weak, the line is moving, and someone needs the details now.
What to do when a domestic flight is delayed or moved
The first few minutes after a delay notice are not the time for doom-scrolling. Start by taking a screenshot of the alert. Then confirm whether the flight number, departure time, gate, or terminal has changed.
Check if the app and the airport display match. Plug in if you can, lower your screen brightness, and avoid letting your battery drain while you are still trying to understand what changed. If the adjustment is small, your main job is simply to stay reachable and organized.
The first 10 minutes after you get a delay notice
In the first ten minutes, do four things in order: save proof, confirm the latest timing, message the people or services meeting you after landing, and decide whether the delay threatens anything that closes or leaves on schedule.
This is also the right moment to reopen the pages that help you think clearly, including Bakasyon’s holiday flight advisory and peak-season delay context, the booking basics and fare fine print guide, the Tips & Inspiration planning archive, the Philippines first-trip planning guide, the public transport guide for buses, jeepneys, and ferries, the Philippines weather travel guide, and the travel safety guide for the Philippines.
If the new schedule still protects your next booking, conserve energy and keep monitoring. If it threatens the rest of the day, move early instead of waiting until everyone is queuing at once.
When to ask about rebooking, refund, meals, or onward options
Ask for help as soon as the delay endangers something meaningful: the last ferry, a prepaid van seat, a hotel front desk that closes early, an event with a fixed start, or a same-day plan that cannot slide.
Go to the counter or the official digital channel with your booking reference ready and a clear request in mind. That request might be rebooking to the next workable flight, clarifying refund options, or asking what support is available if the delay stretches. Keep the tone calm and specific. Staff can usually help faster when the ask is concrete.
Meals and other assistance often become part of the conversation once the disruption is more serious, but the first priority is still protecting the rest of your itinerary. Reality Check: long explanations rarely move the line faster. One clear sentence about what you need is more effective than retelling the whole day.
How to protect your hotel check-in, van seat, ferry ticket, or tour
Once the flight moves, protect the bookings after it. Message the hotel with your updated ETA and ask for the latest acceptable check-in time. Contact the van operator or driver and ask whether the pickup can be shifted. If there is a ferry or tour, check whether same-day revalidation is possible and what proof they need. Send one screenshot of the delay notice if useful, but do not assume that “flight delayed” automatically saves your slot. The earlier you communicate, the more options you usually keep.
For shared family trips, choose one person to handle airline updates and one person to handle onward bookings. That small division of labor can keep a stressful terminal from becoming a group chat spiral.
Carry-on vs checked bag for different trip styles
The better baggage choice depends on the shape of the trip, not just the fare.
A one-base city break usually rewards a lighter setup. A transfer-heavy, weather-sensitive, or family trip may reward paying for space and removing guesswork. Think less about pride in packing light and more about how much you want to carry while lining up, changing vehicles, or arriving tired.
Best for short city breaks and one-base trips
Carry-on only is usually the better move for short city breaks, overnight events, work trips, and one-base vacations where laundry, convenience stores, and simple outfits are easy to find. It keeps the arrival cleaner, the exit faster, and the mental load lower. You can land, head out, and start the trip with less waiting and less bag management.
Best for island hops, family travel, and pasalubong-heavy returns
Checked baggage makes more sense for island hops with swimwear and sandals, multi-stop trips, travel with children, or return flights where pasalubong is almost guaranteed. It also helps when one person is already carrying shared chargers, medicines, snacks, and documents in a personal item.
Trip style also changes how painful a delay feels, so it is worth reviewing the official summary of the rights of air passengers and the passenger FAQ on complaints and next steps before flying.
Reality Check: there is no medal for suffering through an overstuffed cabin bag. If checked baggage will noticeably calm the day, that is often money well spent.
Low-stress airport habits that help more than hype
Good airport habits are not dramatic. They are the small things that protect comfort when the terminal is cold, the queue is slow, or the gate changes with little warning.
For domestic flights in the Philippines, wear clothes you can sit in comfortably for hours and shoes that can handle walking and security trays without fuss. Keep your valid ID, phone, charger, power bank, wallet, tissues, medicine, pen, and one light layer in your personal item every single time.
What to wear and keep in your personal item
Your personal item should carry the things that would make the whole day harder if separated from you: prescription medicine, valuables, ID, boarding details, a charging cable, power bank, earphones, wipes, and one snack that does not melt into a mess. A toothbrush, face towel, and extra shirt are smart additions for longer travel chains. Dress for changing temperatures, not just the weather outside. Philippine heat on the curb can turn into aggressive air-conditioning inside the terminal.
Small habits for charging, snacks, water, meds, and gate changes
Charge fully before leaving home. Top up again when you see an outlet, not when your battery is already struggling. Bring a refillable bottle if practical and buy water after security if needed.
Eat something light before the airport or pack a simple snack, especially if medicines need food. Keep checking the gate even after you sit down, and resist wandering too far if the boarding time is near. Reality Check: discomfort makes delays feel longer. A charged phone, a snack, and the right medication can change the mood of the whole wait.
A calmer landing plan after baggage claim
 Landing is not the end of the logistics. After a domestic flight, pause for one minute before stepping into the next queue. Confirm your pickup point, check your hotel address again, and decide whether you need cash, a restroom stop, or a quick message home before moving.
If you checked a bag, take a fresh photo once you receive it, especially if you notice damage or delay. If you are heading to public transport, know the next step before walking outside so you are not making decisions in the hottest, noisiest part of the terminal.
How to reset for airport transfer, public transport, or hotel check-in
Reset the plan in simple order: collect bag, confirm transport, message arrival, hydrate, and move. For hotel check-in, keep the booking name and address ready. For airport transfer, verify the plate number or meeting point before walking off with anyone. For public transport, protect your phone battery for navigation and updates, not just photos.
Reality Check: the calmest travelers after landing are usually the ones who treat the last mile as part of the flight day, not as an afterthought.
That is the real rhythm of Philippines domestic flights: not perfect, not always fast, but far more manageable when baggage is chosen on purpose, timing is realistic, and the important details are already in your hand. A little preparation turns the airport from a pressure point into a bridge, and that leaves more energy for the trip you actually came to enjoy.


")
