

If you want beach light without stressful trekking, Zambales is one of the easier provinces to plan around—long coastlines, open horizons, and plenty of spots where travelers can shoot from the sand, a promenade, or a roadside stop. This guide focuses on easy Photography Spots In Zambales only: minimal walking, clear safety checks, and simple ways to get consistent photos even if the weather turns.
If you like calm, planning-first reads like this, you can also browse Tips & Inspiration for more trip-friendly guides and check quick province context via Zambales Province Overview.
At-a-Glance
Best light window: Late afternoon to sunset for warm skies; early morning for quieter beaches and softer shadows.
Realistic travel time: Day trip is possible from nearby hubs, but an overnight helps you catch both morning and sunset without rushing.
Budget band: Budget to mid-range, depending on boats, island day trips, and where you base. Prices and access rules can change—travelers can confirm locally before paying.
Crowd and traffic risk: Weekends and holidays can bottleneck around popular beaches and town centers, especially near sunset.
Rain and heat backup: Waterfront promenades, covered markets (with permission), cafés with window light, and wet-sand reflections can still produce good frames.
Reality Check: “Easy” does not always mean “empty.” Even simple beachfront spots can feel busy at golden hour, and some island trips get canceled when seas are rough.
Photography Spots In Zambales: What Makes Zambales Easy For Golden Hour Photos
Zambales faces west, so sunset is naturally the main show along many beaches—travelers can stay near their base and still get wide, open-sky scenes. Many coastal areas also have long, walkable shorelines where you can build simple compositions (horizon, silhouettes, reflections) without needing dramatic viewpoints.
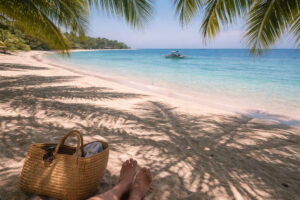
Another planning advantage: it’s easy to choose your “style” per stop. Want clean minimalism? Aim for open sand and a straight horizon. Want texture? Look for fishing boats, nets, driftwood, or Agoho Trees for foreground layers. Want city-coast contrast? Subic Bay’s waterfront is walkable and forgiving in overcast light.
Reality Check: The same west-facing coastline that makes sunsets beautiful can also bring afternoon wind. A small tripod, wrist strap, and lens cloth help keep shots steady and clean.
Why Sunset Is The Main Event On The Zambales Coast
For most travelers, sunset is the simplest win: you can plan one late-afternoon block, arrive early for a calm setup, and shoot as the light softens. West-facing beaches often give you color gradients (gold to pink to blue) plus silhouettes—surfers, fishing boats, kids running on the shore—without needing perfect weather.
Safety-wise, sunset also works well because you can shoot from stable ground: sand, a seawall, or a promenade. If waves look aggressive or wind is pushing sand into your gear, you can still pivot to tighter frames (hands holding coffee, footprints, textures, reflections) without going near the waterline.
Quick Timing Guide: Golden Hour And Blue Hour In Plain Language
Golden hour is the warm, softer light before sunset (and after sunrise). For planning, think: “arrive 60–90 minutes before sunset” so you can scout, pick a clean horizon, and shoot as the sky changes. Blue hour is the cooler, quieter light after the sun dips—great for calm water, harbor scenes, and street lights starting to glow.
Sunrise vs sunset: sunrise often means fewer people, less wind, and cleaner sand patterns; sunset often means better color on the Zambales coast. If you can only pick one, most travelers choose sunset for drama and convenience.
Easy Photography Spots In Zambales (No Risky Hikes)
These are Photography Spots In Zambales where travelers can shoot from flat ground, short paths, or walkable waterfront areas. Island stops involve boats, so treat them as “easy if conditions are calm and access is allowed.” Always ask local operators about waves, wind, and return times before committing.
Reality Check: “Easy” island trips are still weather-dependent. If locals say seas are rough, it’s a good day to stay mainland and shoot town textures or Subic Bay instead.
Liwliwa Beach San Felipe: Shoreline, Surf Silhouettes, And Simple Compositions
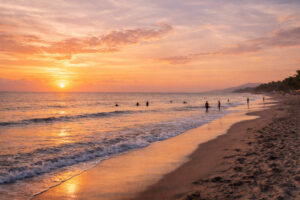 Liwliwa Beach in San Felipe is popular for a reason: a wide shoreline makes it easy to keep horizons clean, and the surf culture adds motion and silhouettes. Travelers can shoot minimal frames (one subject + open sky), or layer foreground textures like footprints, driftwood, and shallow puddles that reflect color.
Look for Agoho Trees near beach areas for shade and framing, especially if you arrive earlier than golden hour. If surf is strong, stay back from the wet sand edge—your safest photos can still happen a few meters inland with silhouettes and sky color doing the work.
Pundaquit San Antonio: Fishing Boats, Calm Morning Details, Easy Sand Textures
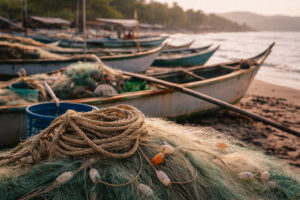 Pundaquit in San Antonio can feel more “working coast,” which is great for detail shots: boats parked on sand, ropes, nets, painted hulls, and early-morning routines. Morning light is often softer here, and you can get storytelling frames without chasing a viewpoint.
For respectful shooting, it helps to ask before photographing people at close range. If you want portraits, be clear, keep it quick, and show the photo after—small gestures go a long way.
Potipot Island Candelaria: Short Boat Ride, Wide Horizons, Shade And Midday Strategy
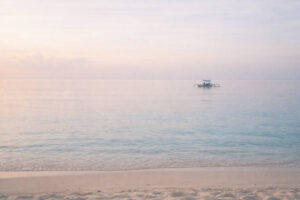 Potipot Island in Candelaria is known for wide horizons and clean water color. It’s often a short boat ride, and once you land, the island is generally flat—good for travelers who want simple walking and straightforward compositions.
Midday can be harsh, so plan either early morning or late afternoon when possible. If you’re there at noon, use shade (or create it), shoot tighter textures, and lean into high-contrast shapes rather than forcing wide sky color. Also note that access rules and conditions can change; travelers can confirm with local operators the same day.
If you’re building a beach-and-cove itinerary, pair this with ideas from Zambales Hidden Beaches so you can plan variety without adding risky climbs.
Magalawa Island Palauig: Softer Island Mood, Quiet Frames, Respecting Private Spaces
Magalawa Island in Palauig tends to suit a quieter photo mood: slower pace, softer details, and more space for simple “one subject” frames—boats on calm water, gentle shoreline curves, and clean sand textures during soft light.
Some areas can be private or community-managed. Travelers can keep things low-stress by staying within allowed zones, following signage, and asking staff before photographing interiors, cottages, or anyone resting. For calm storytelling, shoot hands, footprints, and wide scenes where faces are not the focus.
Subic Bay Waterfront: Walkable Views, Boats, Street Details, Overcast-Friendly Shots
Subic Bay’s waterfront is a reliable, low-stress option when weather is moody. Overcast skies can give even light, which helps with street details: boats, railings, reflections on pavement, and small scenes like coffee cups by a window.
Travelers can also use the bay area as a “reset stop” between beaches—restrooms, food, and easier transport options can make your shooting day smoother.
Town Stops For Texture: Markets, Coastal Roads, Murals, And Local Food Scenes (Ask Before Shooting People)
If you want variety beyond sand and sky, plan quick town stops: roadside fruit stands, murals, local bakeries, and small markets. These are easy to reach and help balance your photo set—hands exchanging coins, baskets of produce, steam from food stalls, and colorful signage.
Keep it respectful: ask before taking close photos of vendors or customers, avoid blocking pathways, and be mindful with flash. When in doubt, step back and shoot wider scenes where individuals are not identifiable.
After you build your shortlist, you can explore more destination pages under Zambales to match stops to your base town.
Best Time Of Day For Each Spot Type
The easiest way to improve your results is to match the spot to the light. Travelers can plan “one hero light moment” (usually sunset) and fill the rest with softer morning or shaded detail shots.
Reality Check: Sunset is predictable, but clouds and wind are not. Build a plan that still works if color is muted—textures, silhouettes, and reflections can carry the story.
Beaches And Breakwaters
 Best for: sunset gradients, silhouettes, wet-sand reflections, calm wide horizons.
Plan: arrive 60–90 minutes before sunset to scout a clean horizon. If wind picks up, move away from the waterline and shoot slightly tighter compositions. Keep your phone/camera low and stable, and use simple foreground elements (footprints, driftwood, shoreline curve) for depth.
Safety check: if waves are strong, don’t stand on slippery rocks or rush the tide edge for a “closer” shot. A safe distance still gives you scale and mood.
Islands And Lighthouses (If Access Is Allowed)
Best for: wide seascapes, sand textures, boat details, and clean horizons.
Island trips can be “easy” when seas are calm and schedules are clear. If you’re considering a lighthouse stop like Capones Island Lighthouse, treat it as optional: travelers can ask about current access, walking conditions, and wave advisories. If the route involves uneven ground or rough boat landings, it’s okay to skip and focus on mainland golden hour instead.
Safety check: avoid cliff edges and keep a conservative distance from waves. Let the scene be wide and calm rather than risky and close.
Town And Street Photos (Soft Morning Light, Less Crowds)
Best for: strong quieter streets, markets, murals, food scenes, and gentle shadows.
Morning is often calmer and cooler. Travelers can shoot storefronts, tricycle lines, and local breakfast scenes with softer contrast. If you want people in the frame, aim for respectful storytelling: hands, movement, and context over close faces—unless you have clear consent.
Simple Phone And Camera Settings That Work In Zambales Light
You don’t need complex gear for Photography Spots In Zambales. What helps most is controlling exposure, keeping horizons straight, and protecting highlights (bright skies) so your colors don’t wash out.
Reality Check: Phone cameras can over-brighten sunsets and turn skies pale. A few small adjustments usually bring back the mood.
Sunset Recipe: Lock Exposure, Lower Highlights, Keep Horizons Straight
For phones: tap-and-hold on the sky near the sun to lock focus/exposure (if your phone supports it), then slide exposure slightly down until the sky looks rich instead of white. If your phone has “highlight” control, lower it a bit. Keep the horizon level—use the grid if available.
For cameras: slightly underexpose (often around -0.3 to -1.0, depending on the scene) to protect the sky. If you want silhouettes, expose for the sky and let the subject go dark on purpose.
Harsh Noon Recipe: Shade, HDR, Step Back And Use Leading Lines
 Noon light can still work if you change your goal. Travelers can use shade (trees, huts, umbrellas) to soften faces and reduce glare. Turn on HDR if the scene has extreme bright/dark areas, then step back and compose with lines: a shoreline curve, a fence, or a path leading into the frame.
If water is sparkling too much, try shooting slightly away from the sun or include more land texture so the photo has calmer areas for the eye to rest.
Cloudy And Rain Recipe: Use Reflections, Keep ISO Reasonable, Stabilize
Cloudy light is gentle and often flattering for details: boats, food, street textures, and portraits (with consent). After a light rain, wet sand and pavement can create reflections—great for minimalist frames.
Stability matters more in low light. Lean on a railing, use a small tripod, or rest your phone on a bag. If your camera allows it, keep ISO moderate and use stabilization instead of pushing ISO too high.
Respectful Photography Etiquette In Zambales
Good photos feel better when they’re made respectfully. In Photography Spots In Zambales, etiquette is part of safety—less conflict, less stress, and clearer boundaries.
Reality Check: “Public space” doesn’t always mean “free to photograph anyone closely.” A quick ask protects everyone’s comfort and keeps your day smooth. For a broader reminder list, travelers can scan Travel Safety Guide.
Asking Consent And Being Clear When Taking Portraits
If you want a close portrait, ask first. Keep your request simple, show your camera/phone, and accept “no” without pushing. If someone agrees, take a few quick frames, say thank you, and offer to show the result. Avoid photographing children closely without a parent or guardian’s clear permission.
Churches, Aeta Communities, And Private Property Boundaries
For churches: look for signs, avoid flash, and keep quiet during services. For Indigenous communities such as Aeta communities, treat photography as permission-based, not automatic. Travelers can ask local guides or community representatives first, avoid photographing sacred moments, and follow any “no photo” requests immediately.
For resorts, cafés, and private beaches: always ask staff before photographing interiors, staff members, or other guests up close.
Drone Courtesy And Crowd Awareness (If You Fly, Follow Local Rules)
If you use a drone, be extra conservative: avoid flying over crowds, respect privacy, and follow local restrictions. Some areas may require permission or may not allow drones at all. Even when allowed, golden hour is busy—travelers can choose a quieter time or skip drone flights to keep the atmosphere relaxed for everyone.
Weather, Wind, And Rain Protection Notes
Zambales weather is strongly shaped by seasonal winds. Planning around them helps you choose safer beaches and protect your gear.
Reality Check: Even in “good months,” sudden showers happen. A simple protection kit keeps your phone/camera usable instead of packed away.
Habagat Vs Amihan In Practical Terms For Zambales Planning
Amihan (Northeast Monsoon) is generally the cooler, drier season many travelers prefer for clearer skies and calmer planning, often around late-year to early-year months. Habagat (Southwest Monsoon) is typically wetter and can bring stronger wave conditions on some coasts, often mid-year.
For month-by-month planning, it helps to check Philippines Weather Guide and look at official updates like PAGASA Climate Advisories before you lock in island day trips.
Sudden Showers Checklist: Dry Bag, Zip Pouch, Microfiber, Silica Gel
Travelers can keep a small “grab kit” near the top of the day bag:
- Small dry bag (or roll-top pouch) for camera/phone when walking in rain
- Zip pouch for power bank, cards, and cables
- Microfiber cloth for lens and screen
- A few silica gel packs to reduce moisture in enclosed storage
- Lightweight rain jacket or poncho (so your hands stay free)
If rain starts, prioritize safety over shooting: step under shelter first, then wipe gear only after you’re out of direct wind-driven rain.
Salt And Sand Protection: End-Of-Day Cleaning Routine
Salt and sand are the quiet gear-killers on beach trips. Keep lens changes minimal, and don’t wipe a sandy lens dry—blow or brush off grit first. At the end of the day, gently wipe surfaces with a slightly damp cloth, then dry with microfiber. For phones, clean ports carefully and avoid charging until the device is fully dry.
Getting Around And Low-Stress Photo Planning
If you want multiple photo stops without stress, choose one base area and plan short hops. The best itineraries for Photography Spots In Zambales feel unhurried: one main sunset stop, one morning detail stop, and one flexible backup.
Reality Check: Travel time expands in real life—waiting for rides, eating, bathroom breaks, and weather pauses. Buffers are what make the day feel calm.
Base Areas And How To String Short Stops Without Rushing
Travelers can pick a base that matches their priorities:
- San Felipe / Liwliwa Beach area: easy sunsets, beach texture, Agoho Trees, relaxed pacing
- San Antonio / Pundaquit area: boat-and-island options (when safe), fishing details, morning scenes
- Subic Bay area: walkable waterfront, overcast-friendly city-coast frames, convenient resets
Then plan a “three-block day”: (1) early morning textures, (2) midday shaded details or Subic Bay reset, (3) sunset hero shoot. If you want a general buffer mindset for Philippine routes, the Philippines Travel Planning Guide is a helpful reference point.
Transport Reality: Tricycles, Vans, Buffers, And Early Departures
Within towns, tricycles are often the practical way to do short hops—especially if you’re carrying gear and want door-to-door convenience. For longer stretches, travelers may use local vans, point-to-point options, or arranged transport depending on the area and schedule.
Start early if you’re stacking stops. Morning gives you better light and fewer delays. If you’re mapping inter-town routes, this overview can help set expectations: Philippines Public Transport Guide.
Crowd Timing: Weekdays, Holiday Spikes, And Sunset Bottlenecks
Weekdays are calmer for beach setups and waterfront walks. Weekends and holidays can create sunset bottlenecks—parking fills up, beachfront cafés get busy, and the best “clean horizon” spots become crowded. Travelers can arrive earlier, shoot a wider scene that includes people as scale, or shift slightly away from the most obvious area to find calmer compositions.
If you want a more detailed transport breakdown for the province, see Getting Around Zambales and plan realistic transfer time between stops.
FAQ
What Are The Easiest Photography Spots In Zambales With Minimal Walking?
Liwliwa Beach (San Felipe), Subic Bay waterfront, and many town stops (murals, markets with permission) are the lowest-walking options. Potipot Island and Magalawa Island can still be easy if seas are calm and boat landings are straightforward.
Where Are The Best Sunset And Golden Hour Viewpoints In Zambales?
West-facing beaches like Liwliwa Beach and open shorelines around San Felipe are reliable for sunset color. Subic Bay can be great for blue hour and reflections when clouds soften the light.
What Time Should I Shoot Sunrise Vs Sunset In Zambales?
For sunrise, arrive before first light for clean textures and fewer people. For sunset, arrive 60–90 minutes early to scout, then stay through blue hour for cooler tones and calmer frames.
How Do I Get Around Zambales If I Want Multiple Photo Stops In One Day?
Choose one base town, then use short hops (often tricycles locally) plus a single longer transfer if needed. Build buffers and avoid stacking too many far-apart stops, especially if you want a calm sunset finish.
What Simple Phone Settings Help For Beach Sunsets And Bright Midday Light?
For sunsets: lock exposure on the sky and lower brightness a bit so colors don’t wash out. For noon: use shade, turn on HDR, and compose with lines and textures instead of forcing a big-sky shot.
How Do I Keep My Phone Or Camera Safe From Sand Salt And Sudden Rain?
Use a dry bag or zip pouch, bring microfiber cloths, and avoid wiping sandy lenses dry. After the beach, wipe gear gently and let everything dry before charging or storing.
What Photography Etiquette Should I Follow In Zambales (People Churches Aeta Communities)?
Ask before close portraits, avoid flash in churches, and treat Indigenous community photography as permission-based. When unsure, step back and shoot wider scenes with non-identifiable faces.
How Do I Plan Around Tides Waves And Strong Wind For Safer Beach Photos?
Check local tide timing, keep a conservative distance from the waterline when waves are strong, and secure gear with straps. If wind is sandblasting your lens, pivot to sheltered angles, tighter frames, or town textures.
Closing Notes For Calm Shooting Days
The best Photography Spots In Zambales are often the simplest: flat shorelines, walkable waterfronts, and small town details that don’t demand risky angles. If you plan one hero sunset, add a quiet morning texture stop, and keep a rain backup, you can come home with a balanced set of photos—and a day that still feels like a vacation.


