

If you’re looking for photography spots in Bicol that feel manageable on a phone camera, the best approach is simple: pick easy viewpoints, match them with the right light, and build a backup plan for clouds and sudden rain. The Bicol Region can shift from clear skies to quick showers fast, so a calm plan beats rushing from one place to another.
For more practical travel ideas in the same style, browse Tips & Inspiration.
Before listing locations, it helps to decide your pacing: how early you can start, how many stops you can handle in one day, and which “must-get” view matters most (Mayon Volcano, a calm lake reflection, or a coastline sunset). If you’re mapping your route for the first time, Philippines Travel Planning Guide For First Trip is a helpful overview, and you can keep your Bicol-specific plan grounded with Bicol Travel Guide Low Stress Planning.
At-a-Glance
- Best time window: Drier months usually mean clearer volcano views, but haze still happens; plan sunrise attempts on your first available clear day.
- Realistic travel time: Distances can look short on a map, but road traffic, town centers, and port schedules add time.
- Budget band: Most stops are low-cost (walkways, plazas, church exteriors). Island stops add boat fees and overnight costs.
- Crowd risk: Weekends, holidays, and after-mass hours can get busy at churches and popular viewpoints.
- Heat and rain backup: Use shaded church grounds or covered boulevard areas at noon; swap to cafés, markets (with permission), or indoor details during rain.
Reality Check: Even “easy” photography spots in Bicol can involve waiting for transport, walking under strong sun, and adjusting to sudden weather changes. Build extra time so you’re not forced to shoot in unsafe conditions.
Quick Map Of Easy photography spots in Bicol
How to use this list by province and by light sunrise sunset blue hour
Use this list in two ways: (1) by province (so your stops stay realistic), and (2) by light (so you show up when the scene is naturally easier to shoot). If you’ll be moving between towns, plan around real commute patterns with How To Get Around Bicol Transport Tips, and keep a quick reference for terminals and common rides in Philippines Public Transport Guide Bus Jeepney Ferry.
Sunrise: Often clearer air for Mayon Volcano and lakes. Aim to arrive 30–45 minutes before sunrise for setup and blue hour.
Sunset: Warmer coastlines and boulevards. Aim 60 minutes before sunset if you want both golden hour and post-sunset colors.
Blue hour: Great for church facades and city streets when the sky glows but lights start to appear. Keep your phone steady and protect highlights.
Reality Check: “Just one more stop” can cost the best light. Choose fewer locations per day, and let the light be your schedule.
- Albay: Cagsawa Ruins, Daraga Church, Legazpi Boulevard, Sumlang Lake (Mayon Volcano angles without risky hikes).
- Camarines Sur: Naga City heritage churches and streets; Caramoan Islands beaches timed with boats.
- Camarines Norte: Bagasbas Beach (Daet) for sunrise; Calaguas Island for soft light and simple compositions.
- Sorsogon: Subic Beach Matnog (pink sand look), Bulusan Lake (calm reflections and mist).
- Catanduanes: Puraran Beach area for soft light and surf-at-a-distance etiquette.
- Masbate: Buntod Reef Marine Sanctuary boardwalk for easy angles and water texture.
Best light in Bicol: simple golden hour plan
Light is your biggest “free upgrade,” especially if you’re shooting on a phone. Golden hour reduces harsh shadows, softens skin tones, and makes water and clouds look calmer. For timing and seasonal expectations, you can also scan Philippines Weather Travel Guide Best Months and align your plan with your travel dates.
Reality Check: In the Bicol Region, “golden hour” is not a guarantee of a clear volcano. Treat it as your best chance, not a promise.
Sunrise vs sunset for clearer skies and fewer crowds
For Mayon Volcano and lakes: Sunrise often wins. Air can be steadier, haze is usually lower, and wind is often calmer for reflections. If your schedule allows, make your first clear morning your Mayon Volcano day.
For boulevards and coasts: Sunset is easier to plan around transport and check-in times. Warm side light also flatters shore textures and silhouettes.
For churches: Early morning side light shows carved details without harsh contrast, and it avoids the busiest worship windows.
Crowd timing shortcut: Arrive before the first big wave: before breakfast for outdoor viewpoints, and before late afternoon for sunset promenades.
Cloud strategy for Mayon Volcano views and coastal haze
Cloud strategy for Mayon Volcano: Plan two to three “attempt windows” instead of one. If the summit is covered, shoot lower slopes, foreground details (ruins, street lines, palms), and wait for breaks. Check updated conditions before you leave via PAGASA, and always check official volcano updates through PHIVOLCS when planning Mayon Volcano view days.
Coastal haze strategy: If the horizon looks milky, shift to closer subjects: shoreline curves, boats, sand texture, people in silhouette (with consent), and reflective puddles after rain. Haze can still look beautiful when you stop fighting it and simplify.
Location-specific golden hour guidance
Volcano views: Use foreground anchors (walkways, ruins edges, railings) so your photo still works even if the peak is partly hidden. Expose for the sky to keep clouds and highlights from blowing out.
Coastlines: For sunsets, shoot slightly away from the sun (about 30–60 degrees) to keep color while holding detail in the water. For sunrise beaches, watch for gentle side light that shows sand ripples and footprints.
Lakes: Go early for calmer water. If wind picks up, switch from reflections to details: bamboo rafts, ripples, paddles, and shoreline trees.
Church facades: Morning side light reveals texture. Blue hour works for a calm, respectful exterior shot when the sky deepens and street lamps appear—just keep your presence quiet.
Albay easy views with Mayon Volcano backdrops
 These photography spots in Bicol focus on Albay angles that are accessible and popular for a reason: you can frame Mayon Volcano without steep trails. Always respect any restricted areas and follow local advisories.
Reality Check: Mayon Volcano visibility changes fast. Even on a “clear” day, clouds can roll in within minutes—plan to stay put and shoot variations instead of chasing views.
Cagsawa Ruins golden hour framing and respectful behavior
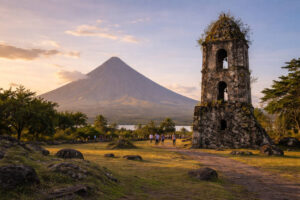 What to shoot: The bell tower and ruins lines as foreground; wide frames with Mayon Volcano centered; tighter shots using arches or stone textures for depth.
Best time of day for light: Late afternoon to sunset for warm glow on stone; early morning if you want fewer people and softer contrast.
Simple access note: Easy entry and flat walking paths. Wear comfortable shoes for uneven stone and packed earth.
Crowd timing tip: Arrive early morning or on a weekday. If you’re there near sunset, step back and shoot wider so people become scale rather than distraction.
Respect note: Keep a respectful distance from private stalls and ask before photographing vendors up close. Avoid blocking pathways where others are lining up for photos.
Daraga Church facade details and quiet timing
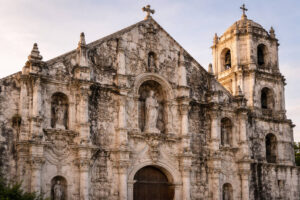 What to shoot: Facade carvings, columns, and symmetrical frames from the church grounds; quiet street context shots from a respectful distance.
Best time of day for light: Morning side light for texture; blue hour for a calm exterior with a soft sky (keep ISO low if possible and stabilize your phone).
Simple access note: Accessible by road with short walks around the church exterior. Dress modestly, especially if you may pass near worship areas.
Crowd timing tip: Avoid peak mass times and weddings. If you arrive and a ceremony is ongoing, switch to distant exterior angles and keep your phone silent.
Respect note: No flash near doors or windows where people may be praying. If unsure, ask a church staff member where photography is appropriate.
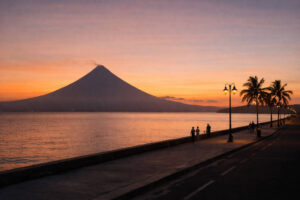
Legazpi Boulevard sea plus Mayon Volcano silhouette at sunset
What to shoot: Wide sunset views over Albay Gulf; Mayon Volcano silhouette; promenade lines leading toward the horizon; candid street scenes from a distance (avoid close-ups without permission).
Best time of day for light: Sunset through blue hour for color shifts and silhouettes. Try a few frames after the sun dips—sky color can peak later.
Simple access note: Flat, easy walking along the boulevard. Bring water and sun protection.
Crowd timing tip: Weekends get busy. Arrive 45–60 minutes before sunset to claim a clean angle, then stay patient as people move through your frame.
Reality Check: Sea breeze can bring spray and haze. Keep a microfiber cloth ready and wipe your lens often.
Sumlang Lake reflection timing and wind tips
What to shoot: Reflections of Mayon Volcano (when visible), bamboo raft details, calm water patterns, and low-angle shots near the shore for depth.
Best time of day for light: Early morning for calmer water and clearer reflections; late afternoon for warmer tones if wind stays mild.
Simple access note: Generally easy access with short walks on maintained paths. Watch for slippery edges after rain.
Crowd timing tip: Go early, especially if you want a clean reflection shot without many boats and paddles crossing the frame.
Reality Check: Reflections depend on wind, not just sunlight. If ripples start, switch to tighter detail shots and accept the texture.
Camarines Sur easy city and water scenes
Camarines Sur balances city details and island scenery. For photography spots in Bicol here, the key is timing: quiet church exteriors when worship is not active, and beach light that matches your boat schedule.
Reality Check: Boat timing can decide your whole shoot. Build buffer time for port waiting and weather holds, especially in the afternoons.
Naga City heritage churches and street scenes with respect
What to shoot: Church exteriors, heritage details, street corners with layered signage, and calm “everyday” scenes from a respectful distance.
Best time of day for light: Morning for soft building light; blue hour for gentle city glow (steady your phone and avoid digital zoom).
Simple access note: Most areas are walkable with short tricycle rides between points. Keep valuables secure in crowded areas.
Crowd timing tip: Avoid shooting right after mass. If you want cleaner frames, arrive earlier, and shoot details (doors, textures, stained glass from outside) rather than wide shots during peak foot traffic.
Respect note: If you plan to photograph inside a church, ask first and follow posted rules. During prayer and ceremonies, keep your phone away and stay quiet.
Caramoan Islands viewpoint beaches without steep climbs, plan for boat timing
What to shoot: Beach curves, limestone shapes from safe, flat shore angles, boat-to-shore perspectives, and simple portraits with the horizon (only with consent).
Best time of day for light: Morning light for cleaner water color; late afternoon for warmer sand tones and softer shadows.
Simple access note: Focus on beaches and coves where you can shoot from the sand or gentle paths. Skip any cliff-edge trails if conditions are wet or unfamiliar.
Crowd timing tip: Ask your boat operator about the usual island-hopping route order, then start earlier to reach popular stops before the bulk of tours.
Reality Check: Sea spray and wind are constant. Keep your phone in a dry pouch between shots and wipe the lens before every “final” frame.
Camarines Norte easy beach light
Camarines Norte is ideal when you want open skies and wide compositions. These photography spots in Bicol are straightforward: arrive early, keep your horizon level, and use the shore as a leading line.
Reality Check: Beaches can look “flat” at noon. If you’re stuck with midday light, shoot closer details (footprints, textures, shadows) instead of forcing wide scenes.
Bagasbas Beach Daet sunrise and wide shore compositions
What to shoot: Sunrise silhouettes, long shoreline curves, surfers from a respectful distance, and wide frames that use footprints or tide lines as leading lines.
Best time of day for light: Sunrise through early morning. If you miss sunrise, stay for soft morning light before the sun gets harsh.
Simple access note: Easy access and flat walking. Watch the tide and avoid stepping too close to strong waves.
Crowd timing tip: Arrive before sunrise if you want cleaner compositions. Later in the morning, include people as part of the story rather than trying to remove them.
Calaguas Island soft light plan and simple protection from sea spray
What to shoot: Soft sand tones, gentle water gradients, simple portrait angles with the shoreline, and small detail shots (shells, shadows, tent lines) to balance wide views.
Best time of day for light: Early morning and late afternoon. Midday can be bright—use shade and shoot details.
Simple access note: Access depends on boats and sea conditions. Pack light, protect electronics, and keep essentials in waterproof bags.
Crowd timing tip: If you’re staying overnight, shoot sunrise for a quieter beach. If you’re day-tripping, ask about first-boat options and return schedules.
Reality Check: Sea spray can fog lenses quickly. A microfiber cloth and a small zip bag you can close fast are more useful than extra filters.
Sorsogon easy coast and lake scenes
Sorsogon gives you two different moods: coastal texture and quiet lake stillness. These photography spots in Bicol are best when you plan for the day’s strongest light and keep a backup for rain.
Reality Check: Roads and lake paths can get slick after showers. Prioritize stable footing and safe walkways over “one more angle.”
Subic Beach Matnog best time for pink sand look and boat schedule reminders
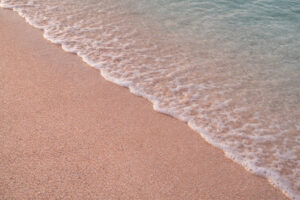 What to shoot: Shoreline texture that shows subtle pink tones, gentle wave patterns, boats as accents, and low-angle shots that keep attention on sand color.
Best time of day for light: Morning to late afternoon when light is softer. After rain, sand color can look richer if the sun comes out briefly.
Simple access note: Easy beach access, but plan around local boat activity and respect working areas.
Crowd timing tip: Go earlier in the day for cleaner shore shots. If boats are frequent, time your frames between arrivals and departures.
Reality Check: “Pink sand” is often subtle, not neon. Shoot closer textures, and keep your white balance natural so the color looks honest.
Bulusan Lake calm reflections and foggy morning expectations
What to shoot: Calm water reflections, tree lines, mist layers, and quiet dock or shoreline details that add depth.
Best time of day for light: Early morning for mist and calmer water; late afternoon for warm side light if conditions are clear.
Simple access note: Generally accessible with short walks. Bring grip-friendly footwear for damp paths.
Crowd timing tip: Arrive early for quieter scenes and cleaner reflections. If the lake area is busy, frame tighter details instead of wide shots that include crowds.
Reality Check: Fog can be thick. If visibility is low, lean into the mood: silhouettes, minimal frames, and gentle contrast edits later.
Catanduanes and Masbate simple add-ons if your route allows
If your itinerary allows side trips, these photography spots in Bicol are accessible options that don’t rely on risky climbs. Prioritize safe distances near waves and follow local guidance, especially during monsoon months.
Reality Check: Add-on provinces often mean extra ferry or port time. Plan these only if your schedule has breathing room.
Puraran Beach area soft light and surf distance etiquette
What to shoot: Surf lines, beach textures, wide sky frames, and surfer silhouettes from a safe, respectful distance.
Best time of day for light: Early morning for clean color; late afternoon for warmer sand and softer highlights on waves.
Simple access note: Choose stable spots on the beach away from strong shore break. Keep electronics protected from sand and spray.
Crowd timing tip: If surf activity peaks later, arrive earlier for simpler beach frames, then switch to action-from-distance when more surfers arrive.
Respect note: Avoid stepping into surf lines or blocking photographers and locals watching the break. Ask before taking close portraits.
Buntod Reef Marine Sanctuary boardwalk angles and midday glare plan
What to shoot: Boardwalk leading lines, water patterns, mangrove textures, and simple “look-down” angles that show clarity and color.
Best time of day for light: Morning or late afternoon to reduce glare. If you’re there at noon, shoot under any shade and frame tighter details.
Simple access note: Boardwalk access makes this easy and stable. Follow site rules and stay within designated areas.
Crowd timing tip: Go earlier for fewer people on the boardwalk. If it’s busy, wait for gaps and shoot in short bursts.
Reality Check: Water glare can make phone photos look washed out. Tap to expose for highlights, and consider using your hand as a small shade above the lens (without blocking the frame).
Phone settings and simple gear that work in Bicol weather
This section is designed for phone-first shooting. The goal is not “perfect settings,” but predictable results at common Bicol lighting conditions.
Reality Check: Phones can over-brighten skies and faces at the same time. A few small controls (exposure lock and highlight control) make a bigger difference than extra apps.
Phone camera basics grid exposure lock HDR RAW if available
Turn on the grid: Use it to keep horizons straight at Bagasbas Beach, Legazpi Boulevard, and Subic Beach Matnog.
Use exposure lock: Tap and hold to lock focus and exposure, then slide exposure down slightly for sunsets and bright clouds.
HDR: Helpful for church facades and bright skies, but avoid it if moving people look “ghosted.”
RAW (if available): Use RAW for challenging scenes like Mayon Volcano with bright clouds. It gives more editing flexibility later.
Golden hour shortcut: Lower exposure a bit, keep highlights safe, and let shadows stay slightly dark for a calmer look.
Quick camera basics ISO control shutter safety and keeping highlights
Keep ISO low: Low ISO preserves detail in skies and reduces noise in blue hour shots.
Shutter safety: If you’re handholding, avoid very slow shutter speeds. Stabilize on railings, benches, or a small tripod if allowed.
Protect highlights: For volcano clouds, bright church walls, and water reflections, expose for the brightest part of the scene, then lift shadows later if needed.
Reality Check: In rainy low light, many cameras will blur motion. Switch to steadier subjects (details, textures, reflections) instead of action.
Rain protection humidity wipes zip bags and dry storage
Sudden showers: Keep a small umbrella or pack cover accessible, not buried. A quick “grab-and-cover” matters more than heavy gear.
Humidity: Bring a microfiber cloth and wipe lenses often. Store camera gear with silica gel packs if you have them.
Sea spray: Use a zip bag between shots on coastal stops like Caramoan Islands, Calaguas Island, Legazpi Boulevard, and Puraran Beach.
When to reschedule: If wind-driven rain is hitting sideways or waves are unusually strong, swap to sheltered subjects (church exteriors from a distance, covered walkways, food details with permission) and return to the coast when conditions ease.
Respectful photography etiquette in Bicol
 Good travel photos should never come at the cost of someone’s comfort, worship, or daily work. The best photography spots in Bicol are often shared spaces, so respect is part of the plan.
Reality Check: Some places feel “public,” but the people inside them may not want to be photographed. If you feel unsure, pause and ask.
Churches worship moments markets and kids ask first
Churches: Prioritize quiet. Avoid flash. Do not block entrances. If a ceremony is happening, keep your phone away and shoot only from areas where staff say it’s allowed.
Markets and vendors: Ask before close-ups of faces or products. Many vendors are happy to be included if you’re polite and quick.
Kids: Always ask a parent or guardian first. If permission feels unclear, don’t take the photo.
Leave no trace, noise, blocking walkways, and drone checks
Leave no trace: Don’t step on fragile areas for a better angle. Stay on paths at lakes, ruins, and sanctuaries.
Be mindful of space: Avoid loud calls, music, or setting bags in the middle of walkways. Let others take their turn at popular frames like Cagsawa Ruins.
Drones: Always check local rules and posted signs. Some areas, especially near churches, ports, and protected sites, may restrict drones.
Safety reminders: Check forecasts before leaving (start with PAGASA), and check official bulletins for Mayon Volcano days via PHIVOLCS. For a broader safety checklist, see Travel Safety Philippines Guide.
FAQ
What are the easiest photography spots in Bicol with no risky hikes?
Cagsawa Ruins, Daraga Church exteriors, Legazpi Boulevard, Sumlang Lake viewpoints, Bagasbas Beach, Subic Beach Matnog, Bulusan Lake access areas, and Buntod Reef Marine Sanctuary boardwalk are easy options. Island stops like Calaguas Island and Caramoan Islands can stay easy if you focus on beach-level angles and safe paths.
What time is best for Mayon Volcano photos, sunrise or sunset?
Sunrise is often better for clearer air and calmer conditions, especially for Mayon Volcano and reflections. Sunset can work well for silhouettes and warm tones if clouds cooperate.
Where can I get a clear Mayon Volcano view without going too close to restricted areas?
Try classic, accessible viewpoints in Albay like Cagsawa Ruins, Legazpi Boulevard, and Sumlang Lake. Always follow local guidance and check PHIVOLCS updates for any restrictions or safety advisories.
How do I plan around clouds, rain, and typhoon season in Bicol?
Build two to three viewing windows for key scenes, check PAGASA before you leave, and keep a rainy-day list of sheltered subjects (church exteriors from a distance, covered walkways, detail shots). If advisories are active, reschedule outdoor coast or volcano-view days.
What are respectful photography rules for churches, markets, and local communities in Bicol?
Ask permission for close-ups, avoid flash in churches, don’t photograph ceremonies unless explicitly allowed, keep quiet during worship, and never block entrances or walkways.
What quick phone camera settings help for golden hour and low light?
Use the grid, lock focus and exposure, lower exposure slightly to protect highlights, turn on HDR when the scene is high-contrast, and stabilize your phone in low light to reduce blur.
What simple gear should I bring for rain protection and humidity?
A small umbrella, zip bags or a dry pouch, a microfiber cloth, a small towel, and optional silica gel packs for storage. Add a simple phone lanyard or strap for safer shooting near water.
How early should I arrive to avoid crowds at popular photo spots?
For sunrise scenes, arrive 30–45 minutes early. For sunset scenes, arrive 45–60 minutes early. For churches, avoid peak mass times and arrive early morning for calmer exteriors.
If your trip includes food stops and cultural context, you can pair your photo list with Bicol Spice Stories Heat Heart Heritage and plan small, respectful “story shots” that don’t interrupt daily life.
With a phone camera and a steady plan, photography spots in Bicol become much easier: show up for the right light, protect your gear from rain and spray, keep your distance from hazards, and treat shared spaces gently. The calm approach usually gets the cleanest frames.


")