

Choosing a Philippines eSIM sounds simple until the real trip details show up. Maybe you land late at night, catch a ferry the next morning, need a banking app that still sends verification codes to your home number, or head to a beach town where the signal feels fine at breakfast and shaky by sunset.
That is why this guide stays narrow on purpose. Instead of repeating the full SIM roundup in Bakasyon’s broad Philippines SIM buying guide, this article helps you decide what fits your trip best: a Philippines eSIM, a physical SIM, or a two-layer setup that gives you less stress when plans shift.
The most useful question is not “Which SIM is cheapest?” but “What can I not afford to mess up after landing?” For some travelers, the answer is instant data for ride-hailing, maps, and hotel contact. For others, it is keeping a home number active for one-time passwords or making sure a mountain transfer day does not turn into a no-signal scramble.
In the Philippines, SIM registration is required before activation, and tourist-validity rules can be time-limited. Treat that as a practical planning window rather than a legal rabbit hole, and confirm the current requirements with your chosen provider before you travel.
At-a-Glance
 Best time window for a smooth setup: before departure or at the airport if you land tired and want mobile data fast. Realistic travel time impact: setup can take just a few minutes when everything works, but registration, QR activation, or device settings can also steal your first half hour after arrival.
Budget band: basic connectivity is usually a small line item compared with transfers and accommodation, so convenience often matters more than shaving off a tiny amount. Crowd and traffic risk: busy arrival halls, delayed flights, and long immigration lines can make “I’ll figure it out later” feel more expensive than expected.
Rain and heat backup: if you are arriving in monsoon-prone months or moving right away to a ferry, van, or provincial stop, save offline maps and booking screenshots before you fly.
Reality Check: the best mobile plan on paper still depends on your phone being open-line, eSIM-compatible if needed, and ready for registration. A calm setup beats a perfect promo you cannot activate when you are jet-lagged.
Philippines eSIM or Physical SIM: Start With the Kind of Trip You’re Actually Taking
When an eSIM is the easier choice
A Philippines eSIM usually makes the most sense for travelers who want data ready as soon as they land, do not want to swap tiny plastic cards in an airport queue, and need to keep their home number active on the same phone. It is especially helpful for short trips with tight first-night logistics, business travel, or multi-stop itineraries where you want your device set before wheels touch down.
If your arrival depends on ride-hailing, map navigation, e-wallet access, and hotel messages, buying online before arrival can feel wonderfully low-drama.
eSIM also suits travelers using dual SIM phones well. You can often keep your home SIM active for incoming texts while using local data on the Philippines eSIM. That setup can be a quiet lifesaver for OTPs, airline logins, or card verification messages that insist on reaching your original number. For first-timers still building the bigger picture of airport arrival, local transport, and first-night timing, Bakasyon’s Philippines first-trip planning guide pairs well with this decision.
Reality Check: eSIM is not magic. Your phone must support it, be carrier-unlocked, and sometimes needs a stable connection to finish setup. A QR code cannot rescue a locked device.
When a physical SIM still makes more sense
A physical SIM still works better for travelers with older or mid-range phones that do not support eSIM, for anyone who wants a local number in a more familiar plug-and-play format, or for people who simply trust something they can remove, reinsert, and troubleshoot more visibly.
A physical SIM can also be the calmer choice if you are nervous about installation menus, device limits, or accidentally changing settings on your main line.
It may also make more sense for longer city stays where you have time to compare options after arrival, or if you prefer in-person help. In some cases, a local staff member at an airport counter or city store can spot a registration issue or APN mismatch faster than you can while standing under fluorescent lights with luggage at your feet.
Reality Check: a physical SIM is not automatically simpler if your tray tool is buried in checked baggage, your home number goes offline, or your banking texts stop arriving the moment you swap cards.
Airport, City, or Before Arrival: Where Travelers Usually Buy
What airport buying solves
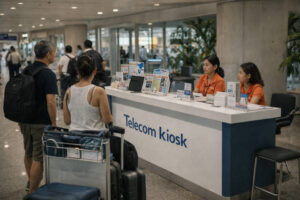 Airport purchase is mostly about reducing arrival friction. It solves the first few hours: booking a ride, messaging your accommodation, checking directions, and avoiding that stranded feeling after a long flight.
If your plan is airport to hotel to sleep, an airport SIM or airport-supported eSIM option is often worth the convenience. Official channels now make the decision wider than airport versus city alone, because travelers can also arrange service online before arrival. Globe’s traveler SIM and airport availability page is one example of an official source covering both pre-arrival and airport access.
Reality Check: airport counters are convenient, but convenience comes with queues, fatigue, and less mental energy for comparing bundles. Buy for function first, not for the feeling that you must optimize every peso on arrival day.
What city buying gives you
City purchase gives you more breathing room. In a mall or telecom store, you may have more time to ask questions, compare physical SIM against eSIM, and sort out device compatibility without the pressure of arrivals.
This can work well if your hotel already has reliable Wi-Fi, your transfer is pre-arranged, or you are traveling with someone who is already connected.
City buying also suits travelers whose first stop is a major hub like Metro Manila or Cebu City and who do not mind waiting a bit before activating local service. You may find the process mentally easier when you are fed, rested, and not trying to steer a luggage cart at the same time.
Reality Check: city purchase only feels flexible if your first day is actually flexible. If you are heading straight into a bus terminal, port, or domestic transfer, “I’ll buy later” can become “I really should have sorted this sooner.”
When buying before arrival is worth it
Buying before arrival is often worth it for late landings, first-time visitors, solo travelers, or anyone heading quickly onward to islands, mountain towns, or multiple transport changes.
A pre-arranged Philippines eSIM is also ideal when your travel day is already crowded with immigration, cash withdrawal, terminal transfers, and finding your way through a new city. Smart’s official prepaid eSIM page reflects how official channels now support online purchase alongside airport or store options.
Reality Check: before-arrival purchase is only the smoothest path if you finish the setup steps before you fly. Saving the QR email but forgetting to confirm compatibility is a very human way to create airport stress.
The Real Tradeoffs Between eSIM and Physical SIM
Convenience, setup, and device limits
The biggest difference between a Philippines eSIM and a physical SIM is not just form. It is where the effort happens.
eSIM shifts more of the work to pre-trip setup: checking compatibility, scanning a QR activation code, reading instructions carefully, and understanding how your phone labels lines for data, calls, and messages. Physical SIM pushes more of the effort to the moment of insertion and registration.
If you like handling things in advance, a Philippines eSIM feels elegant. If you prefer a more tactile process or need staff help, physical SIM may feel safer. Neither option is universally better. The right one depends on your device and your tolerance for fiddly setup menus after a long flight.
Reality Check: some travelers lose more time troubleshooting phone settings than they ever would walking to a counter. Choose the type that matches how you actually behave under travel fatigue.
Local number, calls, texts, and data-only tradeoffs
This is where travelers should slow down. Some eSIM products focus on data, while physical SIM options can feel more straightforward if you want a local number for calls or texts.
If your trip mostly needs maps, messaging apps, booking confirmations, and browser access, data is usually the main priority. But if you expect to call local contacts, receive local SMS, or use services that still lean on regular texting, the details matter.
That is also why it helps to see this article as a support guide rather than a provider comparison chart. The broad decisions around physical SIM, airport SIM, and city purchase are already covered in the main hub. Here, the practical question is simpler: do you need local data only, or do you need a setup that also supports your communication habits without risking your home number?
Reality Check: the “best deal” often matters less than whether your line setup matches how you book, pay, and verify things during the trip.
Coverage Reality Check in the Philippines
Big-city confidence versus island and mountain gaps
 In major urban areas, travelers usually feel more confident using mobile data for maps, ride-hailing, food delivery, and messages. The mood changes once the trip leaves those hubs.
Island routes, inland roads, mountain viewpoints, and some provincial stretches can turn a strong signal into a weak one very quickly. That does not mean you will be disconnected all day. It means coverage can become uneven enough to matter when you need it most.
This is especially important on transfer-heavy days. Bakasyon’s Philippines public transport guide is a helpful reminder that ferry schedules, bus movements, and terminal transitions already involve enough friction without adding zero-data panic. Seasonal weather matters too. In wetter months, reroutes and delays can make backup connectivity feel less like overplanning and more like common sense, which is why the Philippines weather travel guide is worth reviewing before you lock in your setup.
Reality Check: “good coverage” in a destination does not always mean reliable coverage on the road between stops, at ports, or on a trail approach.
When a second network, pocket WiFi, or offline plan matters more than a bigger promo
For island hopping, outdoor trips, remote resorts, or mountain itineraries, the smartest backup is often not a larger promo but a second layer. That could mean a second network on another device, a backup phone, a shared pocket WiFi for a group, or simply a disciplined offline plan with downloaded maps, hotel directions, transport screenshots, and saved contacts.
If your trip includes hikes or adventure-heavy days, Bakasyon’s beginner-friendly adventure travel guide and Beginner Hikes in the Philippines both underline the same truth: scenery can improve as signal gets less predictable.
Reality Check: no carrier promo can replace basic offline readiness. A screenshot taken in calm Wi-Fi is often more useful than extra gigabytes in a dead zone.
How to Keep Your Home Number and Verification Codes Safe
Using dual SIM without locking yourself out
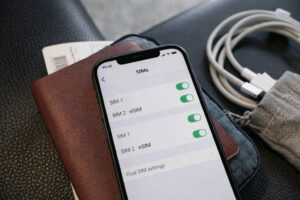
 If your phone supports dual SIM, this is where a Philippines eSIM becomes especially practical. You can often use local data on the eSIM while keeping your home number active for incoming texts. Before departure, label your lines clearly inside your phone settings so you do not accidentally send messages or place calls from the wrong number. Set mobile data to the local line and leave your home line available for important SMS only.
This setup helps you avoid one of the most annoying travel mistakes: discovering that a bank, airline, or authentication app still wants to reach your home number after you have already removed it. Keeping that line active, even quietly, protects your login flow and lowers stress.
Reality Check: dual SIM is helpful only if you understand your device menus. Spend five calm minutes setting defaults before the airport, not after immigration.
Simple OTP and banking precautions before the flight
Before you leave, check which of your critical accounts still rely on SMS verification. Update recovery methods where possible, log in to essential apps, and make sure you know your passwords without relying on autofill alone.
Screenshot your hotel address, flight details, and key bookings. Be cautious with public Wi-Fi, especially when accessing banking or sensitive accounts, and read Bakasyon’s Philippines travel safety guide for a wider arrival-day mindset that keeps stress low and phone handling sensible.
It also helps to carry a charging cable, a power bank, and a SIM ejector pin even if you plan to use only eSIM. Travel likes backups. Your connectivity setup should too.
Reality Check: the real risk is not usually dramatic fraud. It is getting locked out of something boring but essential when you are tired, rushed, and waiting for a transfer.
A Simple Setup Checklist Before Takeoff and After Landing
Pre-flight checklist
Confirm that your phone is open-line. Check whether it supports eSIM and whether your chosen Philippines eSIM can be installed on that model. Read the activation instructions before the airport. Save QR details somewhere accessible.
Download offline maps for your arrival city and first transfer. Screenshot your accommodation booking, terminal directions, and onward tickets. Pack a power bank, charging cable, and SIM ejector pin. If this is part of a bigger planning reset, Bakasyon’s Tips & Inspiration category gathers other practical travel reads in one place.
Airport-arrival checklist
Connect to airport Wi-Fi only if needed and only for basic setup. Activate your local line carefully. Confirm that data roaming is set correctly for the line you intend to use. Test maps, messaging, and one low-stakes website before leaving the airport.
If you bought in person, make sure registration is fully completed and that the line is actually working, not just installed. If you rely on your home number for OTPs, test whether it can still receive a text.
What to do first if activation fails
First, do not keep tapping random settings. Check the basics: is the phone unlocked, is the line enabled, is the correct SIM selected for data, and did registration finish properly? Restart the device. Retry where the instructions tell you to retry, not where panic points you.
If you are in a major airport, official counters or support channels are easier to access immediately than later. If you are already moving onward, switch to your backup plan: airport Wi-Fi for one last download, offline maps, saved booking details, and a transfer screenshot that gets you through the next step.
A Philippines eSIM is often the smartest choice for travelers who want to arrive with less friction, keep a home number active, and avoid fumbling with a SIM tray in the middle of a busy terminal.
A physical SIM still makes sense when your device, habits, or comfort level point in that direction. The real win is not choosing the trendier option. It is choosing the one that matches your itinerary, your phone, and the level of backup you need when the day gets messy. Build for calm, not for perfection, and your connectivity will quietly support the trip instead of becoming part of the problem.


