

If it’s your first time landing in Manila, NAIA can feel like a choose-your-own-adventure—except you’re jet-lagged, hungry, and just want a bed. The confusing part isn’t that the airport is “hard,” it’s that there are multiple terminals (that aren’t all connected), signs you might miss when you’re tired, and transport options that sound similar but work very differently.
This Manila airport survival guide is written for that exact moment: when you’re stepping off a long flight and you need a simple, calming plan. We’ll cover how to confirm your NAIA terminal, when to do the eTravel Philippines QR code (and what else to prep in the Philippines entry requirements update), the step-by-step immigration arrival process, how baggage claim and customs typically flow, how connecting flights and terminal transfers work, and how to choose the simplest ride (Grab, taxi, or bus). We’ll end with a first-night hotel strategy and an “arrive-to-bed” checklist so tomorrow feels easier.
If you like having one place for practical travel habits, you can also browse the Tips and Inspiration section for more first-timer-friendly guides.
Quick Reality Check: Why NAIA Feels Confusing (and How to Stay Calm)
NAIA is one airport, but it behaves like a few separate airports
The biggest “surprise” for first-timers is that NAIA is split into Terminal 1, Terminal 2, Terminal 3, and Terminal 4—and they don’t all connect the way you might expect. A smooth Manila airport survival guide starts with this mindset: don’t memorize; verify. Your airline, your flight number, and your terminal matter more than any old advice you read months ago.
Most stress comes from three moments: lines, transfers, and pickups
In this NAIA arrivals guide, we’ll focus on the points where people get overwhelmed: immigration lines, baggage claim waiting, finding the right exit, switching terminals for connections, and choosing transport without getting pressured (and if you’re arriving during peak travel weeks, this holiday flights Philippines travel advisory mindset helps set expectations). The goal is not perfection—just fewer surprises.
Your best tool is a “small habits” routine, not a complicated plan
You don’t need to be an expert traveler to do well at NAIA. You need a short, repeatable routine: keep documents reachable, take screenshots, follow official pickup points, and pick a first-night hotel area that reduces late-night decision-making. That’s the heart of this Manila airport survival guide.
Before You Land: The 10-Minute Prep That Saves You an Hour Later
Confirm your NAIA terminal (and avoid surprises)
To answer the big question—How do I confirm my NAIA terminal and avoid surprises?—use a two-step check: (1) look at your airline’s most recent email/app notification for your arriving flight and (2) check your booking details (the same place you see your flight number). Terminal assignments and procedures can change, especially during operational updates, so treat any old screenshot from social media as “maybe.” This Manila airport survival guide also recommends taking a fresh screenshot of your itinerary before boarding your final flight to Manila.
If you want Manila-specific context for what to expect once you leave the airport, the Manila travel guides hub is a helpful place to save for later—just not something you want to browse while standing in a line.
eTravel Philippines QR code: what it is, when to register, and what to show
 Do I need eTravel and when should I register? For most travelers arriving in the Philippines, eTravel is part of the arrival workflow. It’s free, and it’s typically best to register within 72 hours before your arrival so your details match your final itinerary. After you submit, you’ll get a QR code (or proof) that you may be asked to show during the airport process. Keep it accessible on your phone and save an offline screenshot as backup.
Use the official site here: eTravel. In this Manila airport survival guide, the golden rule is: do it early enough that you’re not filling forms on a shaky airport Wi-Fi connection after a red-eye flight.
Make your phone useful offline: screenshots and notes to save now
Before landing, create one album or folder named “NAIA.” Save screenshots of: your itinerary/boarding pass, your hotel name and address, your pickup instructions (if any), your eTravel proof, and a screenshot of your terminal number. Add one simple note with: “Terminal, pickup point, hotel area, and Plan B.” This is the quiet superpower behind any Manila airport survival guide—because your brain will be tired when you need it most (and the same approach is explained in Travel Tech Philippines: Essential Gear).
For more planning basics you can do before you fly (so you’re not fixing things at arrivals), this guide is worth bookmarking: Booking flights and hotels guide.
Arrivals Flow, Step by Step: Immigration, Baggage, Customs
Step 1: Follow “Arrivals” and “Immigration” (and don’t panic if it’s crowded)
Here’s the step-by-step arrivals flow most first-timers experience in this NAIA arrivals guide: you disembark, follow Arrivals signage, and enter the immigration arrival process. Lines can look intimidating, especially if several flights land close together. The calm move is to set expectations: you might be standing for a while, so keep water handy, wear a light layer, and have your passport and arrival details ready.
Where delays happen at immigration
What is the step-by-step arrivals flow at NAIA and where do delays happen? Delays often happen when travelers are still searching for documents at the counter, when many flights arrive at the same time, or when people need to re-check details (like onward tickets or addresses). This Manila airport survival guide tip is simple: keep your answers short, keep your documents tidy, and keep your phone on low brightness so you’re not fumbling.
Step 2: Baggage claim (and what to do while you wait)
After immigration, you’ll head to baggage claim. If you checked luggage, confirm your carousel number on the screens. A smart habit in any Manila airport survival guide: while you wait, open your notes and re-check your transport plan (Grab vs taxi vs bus) so you don’t decide under pressure later.
Step 3: Customs: green lane vs declarations, and the “don’t overthink it” rule
Customs is usually straightforward if you’re carrying typical personal items. The main stressor is uncertainty—so follow the lane instructions and keep receipts for high-value items if relevant. In this Manila airport survival guide, the point is not to scare you, but to remind you: move slowly, follow signs, and ask airport personnel if you’re unsure.
Your Carry-On Calm Kit: Small Items That Make a Big Difference
Carry-on essentials list for NAIA arrivals
If you only remember one packing note from this Manila airport survival guide, make it this: keep a tiny “arrivals pouch” in your personal item so you don’t dig through your bag in line. Practical essentials include a pen, power bank, hoodie or light jacket, basic meds, a small snack, wipes, and breath mints (especially after long-haul flights). If you wear contact lenses, add eye drops. If you’re prone to headaches, add your go-to pain reliever (more ideas in 10 Smart Packing Tips Every Traveler Should Know).
The one-bag habit that reduces stress in every line
In any NAIA terminal guide, you’ll hear “keep documents ready,” but here’s the real-life version: passport and phone in the same pocket every time. Receipts and coins in a separate pouch. Everything else zipped. When you’re tired, muscle memory is your friend—this is the quiet logic behind this Manila airport survival guide.
NAIA Terminals in Real Life: What “Terminal 1/2/3/4” Actually Means
Don’t memorize terminal “rules”—verify for your flight
Many first-timers assume there’s one main terminal with different wings. NAIA doesn’t always feel like that. Terminal assignments can shift, and even procedures can change over time. That’s why this Manila airport survival guide keeps repeating the same advice: confirm your terminal using your airline’s latest instructions and official airport pages, especially if you booked months ago.
A simple NAIA terminal guide for first-timers
Think of the terminals as separate buildings with their own arrival exits and pickup areas. Terminal 3 is commonly associated with many international and domestic flights, but that’s not a promise—always confirm. Terminal 1 and Terminal 2 can have different traffic patterns and pickup layouts. Terminal 4 is smaller and can feel simpler, but it also means fewer “choices” inside. This NAIA terminal guide idea isn’t about memorizing which is “best,” but about knowing your exact terminal so your next steps are smooth.
How to re-check your terminal after landing
If you’re still unsure after you land, check your boarding pass, look at airport screens, and ask at an information counter. This Manila airport survival guide is pro-asking: a 20-second question can save you a 20-minute wrong turn—especially when you’re transferring terminals.
Transfers and Connecting Flights: Simple Rules of Thumb
How to transfer between NAIA terminals without spiraling
How to transfer between NAIA terminals? Start with the type of connection you have: (1) a protected connection booked on one ticket (often with baggage handling support) or (2) separate tickets where you need to re-check baggage and manage everything yourself. This Manila airport survival guide treats these as totally different situations—because they are.
If you’re on one ticket, ask airline staff as early as possible where to go for assistance and whether an inter-terminal shuttle is available for connecting passengers at that time. Keep your boarding pass and itinerary ready; you may need to show them to access certain transfer options.
Inter-terminal shuttles: who can use them, and why you must confirm on arrival
Travelers often hear about an “inter-terminal shuttle,” but availability and rules can depend on operational conditions, time of day, and whether you’re a connecting passenger. This Manila airport survival guide won’t overpromise: treat shuttles as a possibility, not a guarantee. Once you land, confirm with your airline or airport staff where the transfer point is and what documents you need to show.
How much buffer time you need for transfers and domestic connections
How much buffer time do I need for a terminal transfer and a domestic connection? If you’re arriving internationally and connecting to a domestic flight, build a generous buffer—especially if you must change terminals, re-check baggage, or pass security again. As a calming rule of thumb in this Manila airport survival guide: aim for several hours of buffer for international-to-domestic connections when terminals differ, and more if you’re traveling at peak hours or during weather disruptions. If your connection is on separate tickets, add even more time because you’re fully responsible for timing, baggage, and check-in cutoffs.
Transport Decision Tree: Fastest vs Simplest vs Budget-Friendly
The quick decision tree (choose based on energy, not just price)
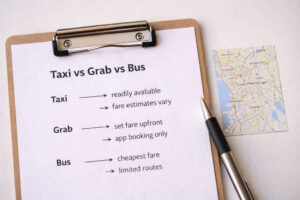
Here’s the heart of the NAIA transportation guide: choose your ride based on how you feel.
Fastest when traffic is reasonable: Grab or a metered taxi (if lines are manageable).
Simplest for first-timers: Grab, because the app documents your trip details.
Budget-friendly (and steady): UBE Express airport bus, when your destination route matches and you can handle luggage (and if you’re planning to use buses or other local transport after your first night, save the Philippines public transport guide for later).
Which transport is simplest for first-timers: Grab, airport taxi, or airport bus? In most first-timer situations, Grab is simplest because it reduces bargaining and gives you clear trip records. But if your phone is dying or data is unreliable, an organized taxi queue can be simpler. This Manila airport survival guide will help you pick the best option for your specific moment.
Option A: Grab from NAIA (The “Most First-Timer Friendly” Choice)
How to book Grab smoothly at arrivals
 For many travelers, Grab is the easiest “landing day” choice in this Manila airport survival guide. Once you have your luggage and you’re out of the restricted arrivals area, open the app, confirm your pickup terminal, and set your destination (hotel name plus full address). Screenshot the booking details—driver name, plate number, and car model—so you can still find the car even if your signal drops.
Where do I go for Grab pickup so I don’t get lost?
Where do I go for Grab pickup so I don’t get lost? Follow signs for official ride-hailing pickup points and read the in-app instructions carefully. NAIA pickup layouts can be specific by terminal, and the safest way to avoid confusion is to stick to the designated Grab NAIA pickup point shown in the app (rather than walking toward random cars calling out destinations). In this Manila airport survival guide, the rule is simple: if the pickup spot doesn’t match your screen, pause and re-check—don’t “guess-walk” with luggage.
How to identify the right car without stress
Before you approach, match three things: the plate number, the car color/model, and the driver name/photo when available. If you’re tired, say the plate number out loud to yourself as you walk (it helps!). This Manila airport survival guide also recommends staying in a well-lit area and keeping your phone in hand until you’re seated.
Option B: Airport Taxis (Know the Types, Use the Organized Queues)
Coupon taxi vs yellow metered taxi vs regular metered taxi
What’s the difference between coupon taxi, yellow metered taxi, and regular metered taxi? The short version in this Manila airport survival guide:
Coupon taxi: typically a fixed or zone-based fare system arranged at a booth—useful if you want price clarity before the ride.
Yellow metered taxi: airport-accredited metered taxis (often with different flag-down or rate structures than city taxis). You pay based on the meter, and you should receive a receipt when possible.
Regular metered taxi: standard city taxis that may also be available in certain contexts—still metered, but experiences can vary widely.
The calming takeaway: whichever you choose, use the official dispatch area/queue, avoid side offers, and keep your receipt. This is one of the biggest “how to avoid taxi problems at NAIA” habits.
How to avoid taxi problems at NAIA (without feeling paranoid)
How to avoid taxi problems at NAIA? This NAIA transportation guide approach is practical, not fearful: (1) only transact at official taxi counters/queues, (2) don’t agree to off-meter deals unless you’re using a clearly posted coupon system, (3) keep small bills accessible, (4) take a quick photo of the taxi details/plate before you ride, and (5) message a friend your ride details if you want extra peace of mind.
Use the official transport info when you’re unsure
Transport rules and pickup locations can change, so it’s smart to rely on the official New NAIA transport information when you need the latest layout and guidance. Here’s the official reference page to save: NAIA transport. This Manila airport survival guide treats official pages as your “tie-breaker” when advice conflicts.
Option C: UBE Express Airport Bus (A Calm Choice When It Matches Your Route)
What UBE Express is and when it’s easier than a car
UBE Express airport bus services can be a budget-friendly option when you’re heading toward major districts and you don’t want to deal with curbside pickup confusion. It can feel calmer if you’re traveling solo with manageable luggage and your drop-off point is close to your hotel.
The two times the airport bus is a smart first-night move
This Manila airport survival guide recommends considering the bus when: (1) you arrive during peak traffic hours and want a steadier ride experience, or (2) your hotel is near a major stop and you’d rather do one clear route than negotiate multiple transfers. If you’re carrying a lot of bags, arriving very late, or traveling with small kids, Grab or an organized taxi is usually simpler.
First-Night Hotel Strategy: Where to Sleep So Tomorrow Is Easier
Best first-night plan if arriving late or tired
Best first-night plan if arriving late or tired? Keep it short and predictable. The best first-night plan in this Manila airport survival guide is often: choose a reputable hotel in an area that minimizes late-night travel and reduces the number of “extra steps.” That might mean staying near the airport if you have an early connection, or choosing a well-serviced business district if you’ll start exploring the next day.
First-night hotel areas: Newport City/near Terminal 3
If you want near-airport convenience—especially helpful for early flights—areas close to Terminal 3 and Newport City are popular for first-timers. The benefit is a shorter ride and less chance you’ll get overwhelmed late at night. In this Manila airport survival guide, this is the “sleep first, decide tomorrow” option.
Makati CBD: practical, central, and easy for services
Makati CBD is a common pick for walkability, dining options, and a “city that knows business travelers.” It can be easier to find 24-hour front desks, strong security routines, and reliable pickup/drop-off points (and it’s a practical base if you plan to explore Manila without a car). For first-timers who want a straightforward base, Makati often feels manageable.
BGC: modern, mapped-out, and beginner-friendly for moving around
BGC is another common first-timer choice because it’s organized, with wide roads, clear landmarks, and lots of dining and convenience options. In this Manila airport survival guide, BGC works well if you want an area that feels easy to navigate on foot during the day—just remember that travel time from NAIA depends on traffic and time of arrival.
How to choose without making “absolute safety” promises
Where should I stay for the first night? Instead of chasing “perfectly safe,” use practical criteria: pick reputable hotels, aim for well-lit main roads, choose properties with visible security and a 24-hour front desk, and prioritize places with easy Grab access and minimal late-night transfers (and if you’re traveling as a family, the pacing notes in Manila with kids: low-stress itineraries can help). For a deeper, realistic mindset (without fear), save this for later: Travel safety Philippines guide.
If you want a feel for Manila’s energy—chaotic, charming, and very alive—this read is lovely once you’re rested: Manila travel guide: culture, chaos, hidden charms (and for an easy “tomorrow plan,” save Manila itinerary 24 hours: a low-stress one-day plan, things to do in Manila for first-timers, and a rainy backup like this Manila rainy-day itinerary).
First-Night Routine: The Calm “Arrive-to-Bed” Checklist
 The moment you enter your room: do these five things first
This Manila airport survival guide checklist is intentionally boring—and that’s why it works. Once you’re in your room: (1) drink water, (2) eat something simple (even just a banana or crackers), (3) shower or wipe down if you’re exhausted, (4) charge everything (phone, power bank, watch), and (5) set one alarm plus one backup alarm.
Prep tomorrow in 3 minutes (future-you will be grateful)
Lay out what you’ll wear, pack a small “morning pouch” (passport, wallet, room key, meds), and write a tiny note: “Terminal, pickup point, wake-up time.” If you have a connecting flight, re-check your terminal and your ride plan while your mind is still calm. This is the soft landing this Manila airport survival guide is aiming for.
If you’re connecting early: choose sleep over late-night exploring
Manila will still be there tomorrow. If you arrived late, prioritize rest and a predictable morning. In this Manila airport survival guide, “winning” your first night means waking up less stressed than you arrived.
Common Arrival Problems and Simple Fixes
Delayed luggage: what to do before you leave the baggage area
If your bag doesn’t arrive, don’t rush out in frustration. Look for the airline’s baggage desk and file a report before leaving the arrivals area. Keep your baggage tag and take photos of any reference numbers. This Manila airport survival guide tip is crucial: leaving first and reporting later can make the process harder.
No data or weak signal: how to keep moving
If your signal is weak, rely on what you saved offline: screenshots of your hotel address, your eTravel proof, and your itinerary. Use airport Wi-Fi only long enough to message your hotel or book a ride if needed. If you planned for this (hello, screenshots), you’ll be fine—this is exactly why a Manila airport survival guide emphasizes offline access.
ATM lines and cash stress: the “small bills” strategy
ATMs can have lines at peak arrival times. If you withdraw cash, aim for small bills so you can pay fares or small purchases without flashing big notes. If you’re using Grab, you may not need much cash immediately—but it’s comforting to have a small amount as backup (and if you want realistic ballparks for daily costs, save Philippines travel budget examples for 1, 2, and 4 weeks). Calm is the theme of this Manila airport survival guide, not maximizing efficiency at all costs.
Pickup confusion: what to do when everything looks the same
If you feel lost at pickup, stop walking and step aside with your luggage. Re-check your terminal, read the pickup instructions slowly, and look for official signage. If you’re using Grab, confirm your Grab NAIA pickup point in-app. If you’re using taxis, return to the official queue/booth. In this Manila airport survival guide, the fix is always the same: pause, verify, then move.
Feeling overwhelmed: the 60-second reset
Jet lag can make everything feel louder. Try a quick reset: feet planted, shoulders down, three slow breaths. Then do one task only—open the “NAIA” folder on your phone and follow your next step. This Manila airport survival guide isn’t just about logistics; it’s about staying kind to your tired brain.
Frequently Asked Questions
How do I confirm my NAIA terminal and avoid surprises?
Check your airline’s latest email/app update and your booking details, then screenshot your itinerary. Terminal assignments can change, so verify close to departure and again after landing if you’re unsure.
Do I need eTravel and when should I register?
Many arrivals need eTravel. It’s free, and registering within 72 hours before arrival is a practical timing window. Save your QR/proof and an offline screenshot. Use the official site: eTravel.
What is the step-by-step arrivals flow at NAIA and where do delays happen?
Typical flow: immigration arrival process → baggage claim → customs. Delays often happen at immigration when many flights arrive together, and at baggage claim when unloading is slow.
How do terminal transfers work, and who can use the inter-terminal shuttle for connecting flights?
It depends on your ticketing and operational conditions. Some connecting passengers may have shuttle options, but you should confirm on arrival with your airline/airport staff and keep boarding passes ready.
Which transport is simplest for first-timers: Grab, airport taxi, or airport bus?
Grab is often simplest because the app records trip details and reduces negotiation. Airport taxis can be simple if you use official queues. The bus can be calm and budget-friendly if your route matches and luggage is manageable.
What’s the difference between coupon taxi, yellow metered taxi, and regular metered taxi?
Coupon taxis use a fixed/zone-based fare via a booth; yellow metered taxis are airport-accredited metered taxis; regular metered taxis are standard city taxis. Use official dispatch areas and keep receipts when possible.
Where do I go for Grab pickup so I don’t get lost?
Follow official signage and the in-app instructions for your terminal’s designated Grab NAIA pickup point. If confused, pause and re-check rather than walking into random pickup crowds.
Where should I stay for the first night?
Choose based on tomorrow’s plan: near Terminal 3/Newport City for early flights or late arrivals, Makati CBD for practical services, or BGC for an organized district feel. Prioritize reputable hotels, 24-hour front desk, and easy pickups.
A Final Calm Reminder (You’ve Got This)
If NAIA feels intense at first, it’s usually because you’re tired—not because you’re doing anything wrong. Keep your Manila airport survival guide habits simple: verify your terminal, keep your eTravel proof and key screenshots offline, expect lines, use official pickup points, and choose a first-night hotel area that reduces late-night decisions. Manila is worth the effort—and your first win is getting to bed with your plans ready for tomorrow.


