

There is a sweet spot between a rushed island sprint and a week-long stay, and that is exactly where this malapascua itinerary 4 days sits.
Four days can work very well for Malapascua Island, but only if you treat Day 1 and Day 4 as partial travel days, keep your biggest paid activity on Day 2, and protect one full buffer day for weather, tiredness, or changing sea conditions.
That calmer rhythm matters here because getting from Cebu or Mactan to Maya Port and then onward to Logon is not just one simple transfer. It is a chain of moving parts, and even when everything goes smoothly, it still uses up attention and energy.
This guide is built for first-timers who want enough beach time to breathe, enough flexibility to avoid panic, and enough structure to make smart choices before leaving home.
Instead of trying to squeeze every corner of the island into one trip, this plan focuses on what really changes the experience: where you stay, what to prebook, which transfer style matches your energy, and how to recover gracefully if weather or delays disturb the original plan. For broader trip prep, it helps to browse a Philippines travel planning guide for first trips before locking the details.
At a Glance
 Best time window: a stable dry-season stretch usually feels easiest, especially when you want smoother boat timing and clearer water.
Realistic travel time: expect most of Day 1 to be a transit-and-settle day from Cebu or Mactan to Maya to Malapascua.
Budget band: budget stays can keep costs manageable, while mid-range beachfront rooms make the pace noticeably easier.
Crowd or traffic risk: weekends, holidays, and peak season can add waiting time on the road and at the port.
Rain or heat backup: keep Day 3 flexible so weather, fatigue, or rougher seas do not collapse the whole trip.
Reality Check: even a well-planned island trip can feel slower than it looks on a map. The point of this itinerary is not speed. It is a smooth, usable pace.
Malapascua Itinerary 4 Days: Is 4 Days Enough?
Yes, 4 days is enough for Malapascua if your expectations match the route. A malapascua itinerary 4 days is not the same as four full island days.
In practice, you are usually getting one arrival afternoon, two real island days, and one departure morning. That still gives you enough time for one meaningful paid activity, one buffer day, beach downtime, good meals, and a proper feel for the island’s slower mood.
Who this itinerary fits best
This setup works best for travelers who want a manageable 4D3N rhythm rather than a checklist-heavy adventure. It suits first-timers, couples, friends, solo travelers, and non-divers who still want to enjoy Malapascua Island without forcing a dive-centered schedule.
It is also a smart fit for people comparing a shorter stay with a longer one. If you know you want more boat outings, more off-beach exploration, or more downtime between activities, read this together with the Malapascua itinerary for 7 days to see whether a longer version would feel better.
Why the first and last days should stay light
The reason is simple: the route is timing-sensitive. Cebu to Malapascua usually means a land transfer to Maya Port first, then a boat crossing, then a short arrival transition in Logon before you can truly relax.
On the way out, the sequence reverses. Keeping the edges of the trip light prevents one delay from spilling stress into everything else. It also gives you room for a slower breakfast, a short beach walk, or a calm wait without the feeling that every minute is being lost.
Reality Check: people often underestimate how tiring transfer chains can be, especially in heat, with bags, or after an early flight. A lighter Day 1 and Day 4 is not wasted time. It is what makes the middle of the trip feel good.
Before You Go: What to Prebook and What Can Wait
 The smartest version of a malapascua itinerary 4 days begins before departure. Prebooking only the right pieces keeps the trip flexible without making it fragile.
The goal is to lock in the parts that become stressful when left too late, then leave weather-sensitive or low-stakes decisions open.
Prebook these if your timing is tight
Accommodation should usually be booked ahead, especially if you are arriving on a weekend, during holidays, or at a time when you do not want to walk around searching with bags. For first-timers, the easiest setup is a stay within comfortable reach of Bounty Beach or central Logon, where food, boat coordination, and basic services are simpler to access.
This is where a guide on where to stay in Malapascua for first-timers becomes genuinely useful because the “best” place is less about luxury and more about how many little frictions it removes.
If your arrival timing is risky, prebook your land transfer too. That can mean a van seat, a hotel-arranged ride, or a private vehicle from Cebu or Mactan to Maya Port. The closer your plan runs to a flight arrival, the more helpful it is to remove one layer of guesswork.
Your main paid activity should also be decided early if it would become stressful to arrange late, especially if you care about a specific operator, time slot, or weather window.
Safe to decide on the day if weather stays stable
Casual beach time, simple snorkeling, shoreline walks, café stops, and low-key food decisions can stay flexible. So can many rest-day choices on Day 3.
This is useful because Malapascua has a different mood depending on sea conditions, your energy, and how smooth the arrival day felt. It is better to choose your easy extras once you can actually see the weather and feel your body.
Kalanggaman day trip planning deserves special caution. Yes, it is beautiful, but in a 4-day setup it usually adds another layer of timing, money, and sea exposure to a trip that already includes transfers. For most first-timers, Kalanggaman is not the best use of a malapascua itinerary 4 days unless it is a high personal priority and the weather looks cooperative.
The lower-stress choice is to enjoy Malapascua properly rather than turning Day 3 into another pressured boat day.
Reality Check: prebooking everything can make a short trip feel rigid, but prebooking nothing can make it feel shaky. The sweet spot is locked-in sleep, locked-in transport when needed, and flexible low-stakes choices once you are on the island.
Day 1: Cebu or Mactan to Maya to Malapascua
Morning block
 Start early and think of the route as a sequence, not a single journey. From Cebu City or Mactan, your first target is Maya Port. Public transport is the cheapest route, but it takes more patience, more waiting, and more mental bandwidth.
A van is the middle-ground option for many travelers because it reduces friction without fully jumping to private-transfer pricing. A private transfer is the easiest on energy, especially if you have luggage, older companions, children, or a flight arrival that already drained you.
For route expectations and transfer styles, it also helps to read the Philippines public transport guide and compare it with more direct arrangements. Travelers building a larger Visayas route may also find the Cagayan de Oro to Malapascua low-stress options guide helpful for understanding how transfer logic changes when you are connecting from elsewhere.
Afternoon block
Once you reach Maya Port, keep your mindset loose. Boats can feel straightforward on a good day, but sea conditions, passenger volume, and waiting time can shift the rhythm.
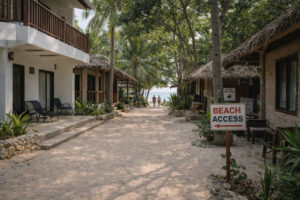
When you arrive on Malapascua Island, avoid the temptation to turn the afternoon into a full sightseeing run. Check in, cool down, shower, hydrate, and let the island come into focus. A short walk around your area in Logon is enough to help you locate food, beach access, and tomorrow’s meeting point if you have an activity booked.
Easy evening plan after check-in
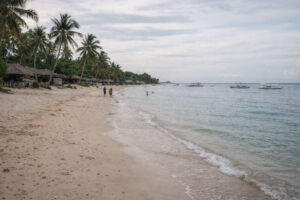
For your first evening, keep it simple: a sunset stroll near Bounty Beach, an easy dinner, and an early night. This is the time to confirm tomorrow’s plan, check cash, charge devices, and set up a stress-free morning.
If you booked a main activity for Day 2, make sure the meeting point and time are already clear. You do not need a “productive” first night. You need a calm one.
Reality Check: even if you arrive earlier than expected, the smartest move is still to stay light. The island will feel better on Day 2 when you are rested instead of trying to prove you used every hour.
Day 2: Main Activity Day
Day 2 is the best day for your main paid activity because it gives you the highest chance of starting rested, adjusted, and ready. In a malapascua itinerary 4 days, this is the day that should carry the most structure. Day 3 stays protected as your true flex day.
Option A for divers or snorkel-first travelers
If your trip revolves around one signature outing, put it here. Divers can keep Day 2 as the most organized part of the plan, while snorkel-first travelers can also use this day for a proper boat-based activity if conditions look good.
Pack lightly but properly: reef-safe basics, sun protection, water, dry storage, and a realistic appetite for a marine day rather than a marathon. This is where prebooking pays off if you are visiting during a busy stretch or want less negotiation on the day itself.
If you are leaning non-diver but still want a sea experience, choose the version that preserves energy. A relaxed snorkeling setup or easy boat departure often feels more rewarding than chasing a packed schedule. The point is not to max out every hour. It is to have one memorable island day that still leaves room to enjoy the evening.
Option B for a calmer non-diver beach day
If you are not diving and do not want a boat-heavy day, make Day 2 your best beach-and-light-exploration day instead. Spend the morning at Bounty Beach or another easy-access stretch, have an unhurried lunch, and keep the afternoon open for gentle swimming, café time, or a short transfer to a quieter shore like Langub Beach if conditions and energy allow.
This version is especially good for travelers who came for the island atmosphere as much as the activities.
You can still make the day feel special without overspending. A comfortable lunch stop, a peaceful swim, and a slow golden-hour walk can give the trip exactly the kind of island memory many people actually want.
Afternoon recovery block
Whichever Day 2 version you choose, leave late afternoon intentionally soft. Return to your room, shower, nap, read, or get a snack before dinner.
This recovery block matters because it prevents Day 3 from becoming a forced rest day caused by overexertion rather than a genuine option. It also helps if the weather shifts and tomorrow needs to become your backup activity day instead.
Reality Check: a main activity day that ends with energy still in the tank is better than one that looks heroic on paper but leaves you too tired to enjoy the rest of the trip.
Day 3: Buffer Day for Weather, Rest, or a Second Activity
 This is the quiet strength of the whole plan. In this malapascua itinerary 4 days, Day 3 is not “empty.” It is protected value. It is your insurance against rain, rough water, delayed energy, or a Day 2 that simply took more out of you than expected.
Weather backup version
If weather interrupted your original plan, use Day 3 to move your main activity here. That is why Day 2 should usually be the preferred activity day, not the only possible one.
Before heading out, check the PAGASA Visayas weather planning page and keep an eye on local conditions. For broader season planning, the Philippines weather travel guide can help set expectations before the trip even begins.
If the sea still looks uncooperative, do not force a boat day. Switch to a shoreline-based plan, a slower café morning, or a light island walk. It is better to preserve the trip’s mood than to spend money on a stressful outing that feels compromised from the start.
Higher-energy version if Day 2 went smoothly
If everything clicked on Day 2 and you still feel good, Day 3 can become your second activity day. This is the best place for extra snorkeling, a more deliberate beach-hopping rhythm, or a scenic half-day with more movement.
It can also be the moment for a more ambitious side option, though this is exactly where Kalanggaman should be judged honestly. In a short trip, that side trip is only worth it if the forecast is stable, your budget allows for it, and you already know that more boat time is a joy rather than a chore for you.
For many travelers, the better use of Day 3 is simply to explore Malapascua Island more fully: a different beach mood, a longer lunch, a sunset spot you missed, or a room with enough comfort to enjoy staying in for an hour or two.
Low-cost rest-day version
 If you want to keep costs down, Day 3 can be beautifully simple. Wake up slowly, have breakfast near the beach, take an easy walk, swim where it feels safe and comfortable, and spend the hot part of the day resting. This version works especially well for budget-conscious travelers because it lets the island do the work. You are not paying for motion. You are enjoying atmosphere.
It is also a good day to notice what kind of stay you booked. Budget rooms can be fine if you mainly need a bed and shower, but mid-range comfort becomes very obvious on a buffer day when shade, quiet, air-conditioning, and easier access to food suddenly feel less like extras and more like relief.
Reality Check: not every “free day” needs to be filled. On a heat-heavy island trip, doing less often feels like the more premium choice.
Day 4: Slow Exit Plan
Morning block
Keep your final morning easy. Have breakfast, enjoy one last beach look, buy any small pasalubong if available, and make sure cash, tickets, and bags are already sorted. This is not the morning to squeeze in one last ambitious outing. A gentle goodbye fits the island better and protects you from last-minute stress.
Check-out and boat timing mindset
Leave yourself margin. Boats do not exist for your personal deadline, and that mental adjustment helps a lot. Confirm the expected crossing rhythm and head out with extra patience rather than a racing-heart schedule.
A good departure mindset is simple: move early, stay hydrated, and assume every leg may take a little longer than the perfect-case version online.
Land transfer choices after Maya
After Maya, choose the land transfer style that matches your remaining energy and onward obligations. Public transport is the lowest-cost option, but it demands the most flexibility. A van is the best middle path for many travelers because it reduces decision fatigue at a manageable price.
A private transfer costs more, but it can be worth it if you are heading to the airport, traveling with companions who need more comfort, or simply want your trip to end smoothly rather than cheaply.
Reality Check: departure day stress usually comes from pretending the transfer is simpler than it is. Build margin, and the final day feels much kinder.
What Costs More and What Feels Easier
One of the most useful parts of planning a malapascua itinerary 4 days is understanding the tradeoff between money, waiting time, and energy. The cheapest option is not always the best value if it eats half your patience before you even arrive.
Budget version
Budget travelers can keep costs low by using public transport to Maya, booking a simple room, eating at modest local spots, and making Day 3 a rest-heavy island day instead of adding another paid trip. This version works best if you are comfortable with waiting, basic logistics, and the possibility that the journey feels longer than the island stay.
Mid-range comfort version
The mid-range comfort version usually gives the best balance. Choose a better-located stay in or near central Logon, take a van instead of full public transport, and keep one paid activity plus one soft buffer day.
This setup often feels easier not because it is luxurious, but because it cuts down the small frictions that make short trips tiring.
Private-transfer comfort version
This is the low-stress route for travelers who care most about ease. A private transfer from Cebu or Mactan to Maya, a well-placed room, and a tightly managed main activity can make the whole trip feel smoother from start to finish. It costs more, but it buys back energy, especially on a 4D3N schedule where every transfer hiccup feels larger.
Reality Check: spending more does not automatically make a trip better, but spending strategically on the friction points can make a short island break feel much more restful.
Practical Notes That Change Plans
Pickup points and transit friction
The route from Cebu to Malapascua looks easy in summary form, but the real experience depends on pickup timing, bag handling, waiting conditions, and how many decisions you need to make while already tired. That is why many travelers prefer a van or arranged ride over the cheapest route. Small frictions multiply on multi-step journeys.
Weather and crowd timing
Weather changes more than scenery. It changes crossing comfort, activity confidence, and even your mood. Weekends and holidays can also make the route feel busier.
For local context beyond the island itself, you can check the Daanbantayan destination page at Daanbantayan local destination context. For more planning ideas after this trip, you can also browse more Travel Guides.
Safety and low-stress habits
Keep valuables simple, hydrate more than you think you need, and avoid forcing sea-based activities in questionable conditions. On short trips, pride is expensive. Calm choices protect both budget and mood.
It also helps to review a practical guide to travel safety in the Philippines before you go, especially if this is one of your first island transfers in the country.
Reality Check: the safest and smoothest travelers are usually the ones who do not try to win against weather, fatigue, or transfer reality.
So, is malapascua itinerary 4 days enough? Yes, absolutely, when you plan for real life rather than perfect timing. Keep Day 1 and Day 4 light, make Day 2 your preferred main activity day, and treat Day 3 as a real buffer instead of spare space to fill.
That one decision changes everything. It gives you room for weather backup, a calm rest day, or a second outing if the trip unfolds beautifully. And that is the real charm of Malapascua Island: not a frantic race to do more, but a gentler pace that still feels deeply rewarding.


