
")
Arriving at Clark International Airport (CRK) can feel simple until you have to make one tired decision: how to get to Metro Manila with luggage, traffic, and pickup rules to think about. This guide focuses on the easiest, safest ways to do the Clark Airport to Manila transfer with minimal confusion: what’s normal at pickup bays, how to choose between Grab, taxi, and P2P bus, and what to save on your phone before you walk out. If you are doing Clark Airport to Manila for the first time, start with the option that has the fewest steps and the clearest pickup process.
Quick answer: the easiest Clark Airport to Manila transfer (default option) and who it’s for
Safest, simplest default for tired arrivals: Grab (door-to-door ride-hailing). For most Clark Airport to Manila arrivals, Grab is the least stressful because it’s cashless (optional), app-tracked, and takes you directly to your hotel without transfers. It’s the best default when you’re arriving late, traveling with kids or seniors, carrying heavy luggage, visiting the Philippines for the first time, or dealing with rain.
Choose Grab when: your energy is low, your destination is deep inside Metro Manila (not near a bus hub), you want clear pickup and drop-off records, or you want to avoid negotiating. If Grab availability is low (peak rush hour, heavy rain, very late-night), your backup for the Clark Airport to Manila transfer is the official airport taxi queue.
Decision-first: choose based on your situation
- You want the easiest door-to-door: Grab (Option 1).
- You want a backup when Grab is slow or unavailable: official airport taxi (Option 2).
- You want the budget option that still works with luggage: P2P bus to a Metro Manila hub (Option 3), then a short Grab/taxi to your hotel.
Quick destination tip: If you’re staying near a hub like Trinoma or Cubao, the P2P bus can be very practical. For Clark Airport to Manila, if you’re headed to areas far from hubs (south Manila, Makati, BGC, Manila Bay, or an airport hotel near NAIA), door-to-door (Grab/taxi) is usually simpler for the final stretch.
Before you leave the airport: quick safety and prep checklist for Clark Airport to Manila
These small steps reduce stress and help you spot what’s “normal” at airport pickup zones.
1) Use official pickup areas and follow signs
- Ride-hailing (Grab): go to the designated ride-hailing pickup area and match the car details in-app before boarding.
- Taxis: use the official taxi stand/queue and dispatcher system (not random offers in the walkway).
- Buses: confirm you’re at the correct airport bus bay/terminal and ask staff to confirm the destination before loading luggage.
2) Do a fast “phone ready” setup
- Make sure your data is working (eSIM/SIM or roaming) and your battery is above 30%.
- Save your destination as a pinned location plus a nearby landmark (mall entrance, hotel name, main road).
- Prepare small cash in case you need a quick taxi, snacks, or a last-mile ride.
If you want a broader checklist for arrivals and first transfers, this helps set expectations without overcomplicating things: Philippines travel planning guide for first trips.
3) Safety norms to keep it calm
At Philippine airports, the safest pattern is simple: official queues, app verification, and no rushed boarding. This matters most when you’re doing Clark Airport to Manila with luggage and low energy. If you need a refresher on everyday travel safety (bags, scams, nighttime awareness), keep this as a quick reference: travel safety guide for the Philippines.
Where pickup happens (and what’s “normal”)
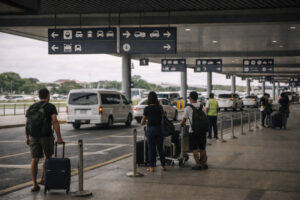 Normal usually looks like this: clear signage to transport bays, staff or dispatchers near taxi queues, and designated waiting zones for ride-hailing. Not normal is being pressured to follow someone away from official bays, being asked to board a car that doesn’t match your booking details, or being pushed into a “fixed price” negotiation in the walkway. For Clark Airport to Manila, “official bay first” is the simplest rule.
For an overview of Clark’s current transport setup and where services are located within the airport flow, you can also check Clark’s official transport guide page: Clark International Airport transportation guide.
Option 1: Grab for Clark Airport to Manila (how it works, what’s normal, what to check)
Grab is usually the easiest Clark Airport to Manila option because the app gives you a recorded booking, fare estimate (subject to conditions), and driver details you can match at pickup. It’s especially helpful when you’re tired and want fewer moving parts.
What to do before you land (2-3 minutes that saves effort)
- Install/update the Grab app before arrival and make sure it opens properly.
- Add a payment method if you prefer cashless; keep cash as backup.
- Save your destination as a pinned location and copy the exact hotel name.
- Decide your “Plan B” if no cars show up (official taxi queue or P2P bus if timing fits).
Where to stand and what’s normal at pickup
Follow airport signs for ride-hailing/transport bays and wait in the designated pickup area. It’s normal to wait a few minutes for the driver to arrive and to receive an in-app message asking where you are within the pickup zone (for example, which bay or which pillar/sign nearby).
What to check in-app before you get in
- Match details: plate number, vehicle type/color, and driver name/photo.
- Confirm route basics: your destination pin and a nearby landmark are correct.
- Keep doors closed until matched: don’t load luggage until you’re sure it’s your booked car.
If there are no cars (or prices feel high)
No-car situations can happen during rush hour, heavy rain, late-night spikes, or holiday traffic. Calm fixes for Clark Airport to Manila:
- Wait 5-10 minutes and retry (availability can refresh quickly).
- Move within the pickup zone to a clearer spot and message your exact landmark (example: “near Bay __ sign”).
- Switch to official taxi if you need to move soon and the queue looks reasonable.
- Consider P2P bus if you’re headed near a hub and you’re comfortable with a last-mile ride to your hotel.
When Grab is better than a bus: if you’re traveling with kids/seniors, have multiple bags, or your hotel is far from bus hubs, Grab often reduces total effort even if it costs more.
Option 2: Airport taxi for Clark Airport to Manila (meter expectations, safety reminders, when it’s better than Grab)
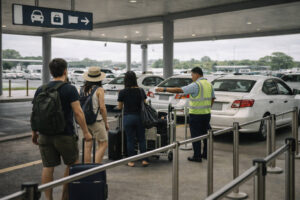 An official airport taxi is your simplest backup when Grab is slow or unavailable. For Clark Airport to Manila, the key is to use the official taxi stand/queue and keep the transaction normal: clear dispatcher flow, no pressured negotiations, and a fare method that’s stated upfront.
What’s normal at the official taxi stand
- A clear taxi queue and/or dispatcher system near the airport transport bays.
- Staff who guide you to the next vehicle or provide basic instructions.
- Taxi details visible on the vehicle, and a driver who understands the destination name.
Meter expectations and avoiding “fixed price” stress
For Clark Airport to Manila, pricing should not feel like a sidewalk negotiation. The calm approach:
- Use only the official stand: decline offers from people approaching you away from the queue.
- State your preference clearly: ask for a metered taxi if that’s the expected setup at the stand.
- If someone insists on a random fixed price: step back and return to the dispatcher/queue rather than arguing.
- Ask for a receipt if available: not all taxis provide one consistently, but it’s reasonable to request.
Practical note: Some airports may also have fixed-rate or “coupon-style” arrangements depending on the taxi type and local setup. If the official stand offers a fixed system, ask what it covers (destination area, tolls) and decide calmly if it fits your comfort level.
Safety reminders that matter
- Take a quick photo or screenshot of the taxi details/plate if you can do so discreetly.
- Share your live location with a trusted contact if you’re traveling solo late at night.
- Keep valuables with you (not in the trunk) and avoid displaying cash.
When taxi can be better than Grab
- Grab has long waits and you’re ready to leave now.
- Your phone battery/data is weak and you don’t want app friction.
- Heavy rain is making ride-hailing availability unstable.
Option 3: P2P bus for Clark Airport to Manila (how to board, where it drops, last-mile plans)
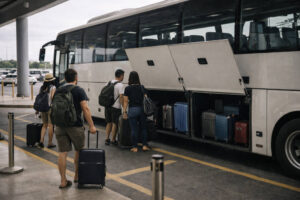 The P2P bus is the budget-friendly Clark Airport to Manila option that still works with luggage, as long as your destination in Manila is near a drop-off hub and you’re okay with one last-mile ride. It’s usually more comfortable than “super budget” local bus chains because it’s designed for airport travelers.
Who the P2P bus is for
- You want to save money and can handle a hub drop-off + short Grab/taxi to your hotel.
- You’re traveling in daytime/early evening when departures are more likely to be available.
- Your hotel is near common hubs such as Trinoma or Cubao, or you’re connecting to NAIA (if the route is operating that day).
Where to board at Clark Airport
Follow airport signs to the bus/P2P bay or transport terminal area. For Clark Airport to Manila by bus, before you load luggage, confirm with staff:
- The operator name (example: Genesis),
- The destination hub (Trinoma, Cubao, or NAIA if offered),
- The next departure window, and
- Where luggage is stored and how claim works.
For current routes and schedules, verify directly with the operator’s page: Genesis P2P bus service.
Where it drops you in Metro Manila (and the simplest last-mile plan)
P2P buses typically drop at major hubs (for example, Trinoma or Cubao) and sometimes offer airport-bound routes depending on current operations. For Clark Airport to Manila, the simplest last-mile plan is:
- From the hub, book a Grab to your hotel using a pinned destination and a nearby landmark.
- If Grab is slow, use an official taxi queue at the terminal/mall area (avoid random offers).
If you want a broader, beginner-friendly explanation of how buses and last-mile connections work in the Philippines, this guide is useful: Philippines public transport guide (bus, jeepney, ferry).
Tradeoffs (so you don’t get surprised)
- Pros: lower cost, luggage-friendly, fewer negotiation issues, predictable drop-off hubs.
- Cons: waiting for departure, limited late-night service, and you still need a last-mile ride.
Super budget but complicated (only for confident commuters)
There are cheaper multi-step routes using local buses/jeepneys and transfers outside the airport flow, but they can be tiring with luggage and confusing when you’re new to the area. For most arriving travelers, the P2P bus is the “budget option that still works” without adding too many steps.
Travel time ranges for Clark Airport to Manila (by time of day) and how much buffer to add
For Clark Airport to Manila travel times, it’s best to think in ranges. Travel time varies because of: pickup waiting, toll gates, incidents on NLEX/SCTEX, and the biggest slowdown: Metro Manila traffic closer to your final neighborhood.
Very early morning (roughly before 6:00 AM)
- Typical range: around 1.5 to 2.5 hours door-to-door, depending on where in Manila you’re going.
- Why it varies: fewer vehicles, but you can still lose time at pickup or near early-shift traffic zones.
Daytime (late morning to mid-afternoon)
- Typical range: around 2 to 3.5 hours.
- Why it varies: Manila-side congestion builds near major exits and business districts.
Rush hour (weekday mornings and late afternoons/evenings)
- Typical range: around 2.5 to 5 hours in worst cases.
- Why it varies: the expressway may move, then the last stretch into Metro Manila slows sharply.
Late evening (after the main rush, but not too late)
- Typical range: around 1.5 to 3 hours.
- Why it varies: fewer vehicles, but rain or incidents can still add delays.
Extra warnings (when to expect the worst)
- Weekdays: morning and late afternoon are the toughest.
- Fridays: outbound/inbound flows can extend evening traffic.
- Holidays and long weekends: expressways and Manila exits can both clog.
- Heavy rain: slower driving, more incidents, and longer pickup waits.
Buffer rule (keep it simple)
If you have a flight, appointment, check-in deadline, or a fixed meet-up time, add a 60-90 minute buffer on top of your “best guess.” If it’s rush hour, Friday, or heavy rain, consider adding even more. For a time-sensitive Clark Airport to Manila transfer, the buffer is what keeps it calm.
Common problems and calm fixes for Clark Airport to Manila (no cars available, long waits, rain, late-night arrivals)
Problem: No Grab cars or very long ETAs
- Retry after a few minutes and move to a clearer pickup point within the designated zone.
- Switch to the official taxi queue if you need to leave sooner.
- If you’re not in a rush and a P2P departure is soon, the bus can be a calm alternative.
Problem: Taxi drivers offering random fixed prices
- Stay within the official stand/queue system.
- If the interaction feels off, step back to the dispatcher and take the next car.
- Keep your destination written down and avoid debating mid-walkway.
Problem: Rain and crowded pickup bays
- Use covered waiting areas near official bays when possible.
- Keep your phone and documents in a waterproof pouch/ziplock.
- Expect slower traffic near Manila and longer pickup times.
Problem: Late-night arrivals and uncertainty about Manila drop-offs
If you’re arriving late, prioritize the option with the fewest steps (usually Grab, then taxi). If you’re being dropped near NAIA or you’re continuing onward early the next day, it can help to plan a “first night” approach: food, cash, and sleep, so you’re not making big decisions at midnight. This optional resource is useful if NAIA is part of your plan: NAIA first night survival guide.
Problem: Low phone battery or weak data
- Use a power bank if you have one; charge briefly before leaving arrivals if outlets are available.
- If data is unreliable, taxi becomes simpler than app-based rides.
- Have your destination written as a screenshot so you can show it without data.
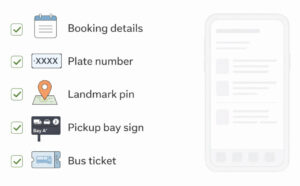
What to screenshot/save for Clark Airport to Manila (the checklist)
 This is the single best habit for a smooth Clark Airport to Manila transfer. Save these before you walk away from arrivals.
- Your destination pin plus a nearby landmark (mall entrance, hotel name, main road).
- Your ride booking page (driver name, plate number, vehicle type) if using Grab.
- A photo of the nearest pickup bay sign (bay name/number or a clear landmark sign).
- If taking the bus: operator name, route/destination hub, departure time window, and ticket/receipt.
- If meeting someone: screenshot of the agreed meet-up point and the time.
- Emergency basics: hotel phone number and a screenshot of your booking confirmation.
Clark Airport to Manila FAQs
Is Grab available from Clark International Airport?
Grab is commonly used for airport pickups, but availability changes with time of day, demand, and weather. For Clark Airport to Manila, if ETAs are long, treat the official taxi queue as your immediate backup.
Do I need cash for the Clark to Manila trip?
Cash helps even if you plan to use Grab. For Clark Airport to Manila, taxis often prefer cash, and you may want cash for snacks, quick last-mile rides, or small needs. Small bills make everything easier.
Is the P2P bus okay with luggage?
Yes, P2P buses are designed for airport travelers and usually have luggage handling. For Clark Airport to Manila, confirm the route and the destination hub with staff before you load bags, and verify current schedules on the operator site.
What’s the biggest cause of delays?
For Clark Airport to Manila, Metro Manila-side traffic near your final neighborhood is often the slowest part, even if the expressway moves well. Heavy rain, Fridays, holidays, and rush hour can add significant time.
Should I go to a hub like Trinoma/Cubao first or go direct to the hotel?
If you’re tired, carrying luggage, or heading far from the hubs, going direct (Grab/taxi) usually reduces total effort. If you’re staying near a hub and you want to save money, P2P + short Grab/taxi can be a practical middle ground for Clark Airport to Manila.
More Tips & Inspiration
If you’re building a smoother arrival routine across the Philippines (transport, safety basics, and simple planning habits), browse more Tips & Inspiration guides. For related routes, keep this same checklist mindset for this route and other airport-to-city transfers.
")


")
: Best Areas For First-Timers")