

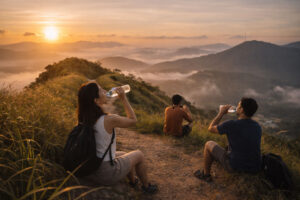
If the word “hike” makes you imagine suffering, steep scrambles, or being the slowest in a group—breathe. This guide is for without the pressure hikes: shorter trails, clear routes, rewarding views, and prep that feels realistic for first-timers. Think: you can stop for photos, take water breaks without guilt, and still feel proud when you get back down.
These beginner hikes Philippines picks focus on day-trip friendly spots near Manila, Cebu, and Baguio. Each one includes approximate trail length, typical time on trail, difficulty in plain language (with “minor climb” notes when helpful), what the views actually look like, guide expectations, and what to prepare so you feel steady—not stressed.
If you want a gentle starting point for outdoor activities beyond hiking, keep this beginner-safe adventure travel guide bookmarked.
Reality check: In the Philippines, weather can flip fast. A trail that feels easy in dry conditions can feel slippery and slow after rain—so timing matters as much as fitness.
Quick “Choose Your Beginner Hike” Guide
Near Manila (day trip):
- Mt. Balagbag (Rizal): Easy-paced minor climb with a road-and-trail mix; great for sunrise vibes and first-timer pacing practice.
- Mt. Gulugod Baboy (Batangas): Coastal panoramas with open, sunny trails; bring sun protection and go early for comfort.
- Mt. Pinatubo Crater Trek (Tarlac): More guided tour + walking trek than a steep hike; ideal if you want “wow” views with managed logistics.
Near Cebu:
- Osmeña Peak (Dalaguete): Short summit walk with dramatic ridge views—big payoff, small effort (but exposed to wind/sun).
- Casino Peak (Dalaguete): Very short but steeper push; best for a quick viewpoint when you’re okay with a bit of burn.
- Mt. Naupa (Naga City): Beginner-friendly climb with a relaxed viewpoint and camping vibe—great for steady pacing.
Near Baguio:
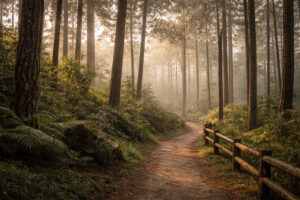
- Camp John Hay Eco Trail / Yellow Trail: Pine forest walk with gentle ups and downs—perfect “no pressure” start in cool air.
- Mt. Kalugong (La Trinidad): Quick climb to rock formations and viewpoints; short, sweet, and photogenic.
- Mt. Ulap Traverse (Itogon): The “beginner graduation” hike—longer but very scenic, best with an early start and steady breaks.
Beginner Hikes Near Manila
 If you are coming from the city, choose hikes with straightforward jump-off points, predictable trail time, and an early start to avoid heat. For more easy-outdoor ideas around the area, this guide to Rizal mountain getaways is a nice add-on for slow mornings and view stops.
Reality check: Manila day trips can feel longer because of traffic. Leaving earlier can make a “beginner hike” feel twice as relaxing.
Mt. Balagbag (Rodriguez, Rizal)
Approx length: ~4–6 km roundtrip (varies with route and where you start).
Typical time on trail: ~1–2 hours to summit; up to ~4 hours roundtrip at an easy pace with breaks.
Difficulty: Beginner-friendly, commonly described as a minor climb. Mostly steady inclines, not technical.
Views: Wide, open viewpoints—especially pretty at sunrise—plus grassy sections that feel calm and spacious.
Guides and registration: Registration is typically part of the process; guides may be optional depending on your group comfort and on-site rules.
First-timer prep notes: Expect exposed sections (sun), and a road/trail mix. Go early, wear a cap, and pace the climb using the “talk test” (you should be able to speak in short sentences).
Reality check: Because parts can feel open and sunny, Mt. Balagbag can feel harder at midday than it does at sunrise. Start early for the gentlest experience.
Mt. Gulugod Baboy (Mabini, Batangas)
 Approx length: ~3–5 km roundtrip (route-dependent).
Typical time on trail: Roughly ~1–2 hours to the peaks from the jump-off, depending on pace; add time for photos and rest.
Difficulty: Minor-climb style; beginner-friendly with steady uphill sections.
Views: Panoramic coastal and bay views—bright blues on clear days, with that “sea breeze + open sky” feeling.
Guides and registration: Some travelers say guides aren’t strictly required, but they’re recommended for first-timers; expect local registration and follow on-site rules.
First-timer prep notes: The trail is open and sun-exposed. Bring sunblock, sunglasses, and more water than you think you need.
Reality check: This is a “sun hike.” Even if the climb is beginner-friendly, heat can drain you—especially if you start late.
Mt. Pinatubo Crater Trek (Tarlac) — the “No-Pressure Walking Trek” Option
Approx length: ~6–8 km total walking (varies by route/jump-off).
Typical time on trail: Often ~1–2 hours of walking each way at a relaxed pace; total day time is longer because of permits and a 4×4 ride to the jump-off.
Difficulty: Beginner-friendly walking trek rather than a steep hike; the challenge is sun exposure and sandy/rocky sections, not scrambling.
Views: A dramatic crater lake scene—wide, otherworldly landscapes that feel very different from typical green mountain trails.
Guides and registration: This is usually managed via guided logistics with permits and local rules; expect required registration and guide coordination as part of the experience.
First-timer prep notes: Pack sun protection, a buff or scarf for dust, and secure your phone/camera. Bring a light rain layer too—weather can shift even on “clear” days.
Reality check: Pinatubo feels “easy” on legs but long on logistics. If you dislike early call times or waiting, choose a shorter local hike instead.
Beginner Hikes Near Cebu
 Cebu’s beginner-friendly hikes are perfect for travelers who want big views in short windows—especially in the Dalaguete area. Start early, bring a light layer for ridges, and don’t underestimate sun exposure.
Reality check: Some Cebu peaks are short but feel intense because they’re steep and exposed. Your pace matters more than the stopwatch.
Osmeña Peak (Dalaguete)
Approx length: ~1–2 km total walking (short summit approach).
Typical time on trail: Often described as ~15–30 minutes to the summit walk, plus time for photos and enjoying the ridge.
Difficulty: Very beginner-friendly; short, straightforward path (minor climb feel, mostly because of incline).
Views: Iconic jagged ridge silhouettes and layered mountain views—especially gorgeous at sunrise and sunset when the light turns soft and golden.
Guides and registration: Many travelers say a guide isn’t necessary for the trail itself, but registration is typical—follow local instructions at the jump-off.
First-timer prep notes: It’s exposed—bring sun protection and a light jacket or wind layer. Watch your footing near edges, especially if it’s foggy.
Reality check: The weather on ridges can feel cooler than the city. A thin layer can make your summit time much more comfortable.
Casino Peak (Dalaguete)
Approx length: ~1–2 km total walking (short approach, route varies).
Typical time on trail: Often ~10–25 minutes up depending on pace; short but punchy.
Difficulty: Beginner-friendly but steeper—think “short climb with a heart-rate moment.”
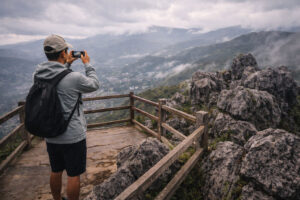
Views: Strong viewpoints with dramatic limestone-like forms and open skies—very photogenic on clear days.
Guides and registration: Rules can vary; expect some form of local registration at the jump-off and ask about current guide expectations.
First-timer prep notes: Rocks can be slippery when wet, and midday heat can feel intense with little shade. Choose early morning if you want the calmest climb.
Reality check: If it rained recently, treat this like a “slow feet” day. Slipping is the most common beginner problem on short, rocky climbs.
Mt. Naupa (Naga City, Cebu)
 Approx length: ~3–5 km roundtrip (varies by starting point).
Typical time on trail: Common reports suggest ~30–60 minutes to the peak depending on pace; longer if you take lots of photo breaks (which you should).
Difficulty: Beginner-friendly short climb; steady inclines with room for breaks.
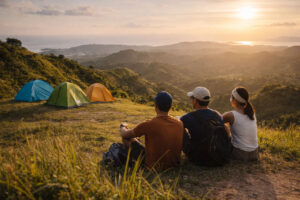
Views: A wide viewpoint that feels “soft” and open, with a camping vibe—great for a slow, proud summit moment.
Guides and registration: Commonly DIY for locals, but visitors should still check jump-off registration and local rules before starting.
First-timer prep notes: Focus on pacing (micro-breaks every few minutes are totally fine). Bring electrolytes if you sweat easily.
Reality check: “Beginner-friendly” doesn’t mean you never get tired. It means the trail gives you space to rest and still enjoy the view.
After your hike, Cebu’s highland stops can be a cozy reward—coffee views, cooler air, and slower pacing. This guide to Cebu mountain escapes is perfect for post-hike add-ons.
Beginner Hikes Near Baguio
Baguio and Benguet hikes feel different: cooler air, pine scents, and weather that can shift from sunny to misty fast. If you’re building a full trip around the city, pair these trails with markets and slow afternoons from this Baguio itinerary.
Reality check: The cool air can trick you into under-hydrating. You still need steady water, even if you don’t feel sweaty.
Camp John Hay Eco Trail / Yellow Trail (Baguio City)
 Approx length: ~2–4 km depending on route/loop choices.
Typical time on trail: Around 1–1.5 hours is a common pace, including gentle pauses for photos.
Difficulty: Easy forest walk with mild ups and downs—ideal for acclimating without pressure.
Views: Pine trees, shaded paths, quiet forest energy—more “reset walk” than “summit chase.”
Guides and registration: Typically managed like a park trail; follow posted rules and any entrance/registration guidance on-site.
First-timer prep notes: Wear comfy shoes with grip (pine needles can be slippery on damp soil). Bring a light jacket—Baguio breezes can feel sharp.
Reality check: This is perfect if you’re tired from travel. You still get nature and movement without the pressure of a summit.
Mt. Kalugong (La Trinidad)
 Approx length: ~1–3 km total walking (short climb plus exploring viewpoints).
Typical time on trail: Often described as ~20–30 minutes up; add time to explore rock formations and viewpoints.
Difficulty: Beginner-friendly with a short steeper push; rocks can feel tricky if wet.
Views: Rocky formations with wide valley views—great for photos and a quick “wow” without a long trek.
Guides and registration: Commonly straightforward entry/registration; ask about current rules and safe zones around rock areas.
First-timer prep notes: Go slow on rocks, especially after rain. Prioritize grippy soles over “cute shoes.”
Reality check: Short hikes can still demand attention. One careful step at a time is the real beginner skill.
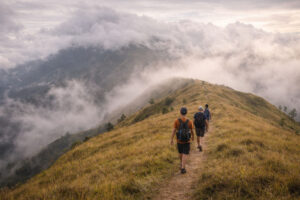
Mt. Ulap Traverse (Itogon, Benguet) — the Beginner “Graduation” Hike
 Approx length: About 9 km for the traverse.
Typical time on trail: Usually 4–6 hours depending on breaks and group pace.
Difficulty: Beginner-friendly for those ready to go longer—expect sustained walking, rolling ascents/descents, and weather exposure on ridges.
Views: Scenic grasslands, pine ridges, and “cloud cinema” moments when mist rolls in—one of those hikes where you keep stopping to say, “Wait, look at that.”
Guides and registration: Registration at Ampucao Barangay Hall is part of the process, and guide fees are commonly treated as mandatory in many DIY resources. Confirm the latest rules, fees, and cut-off times at registration.
First-timer prep notes: Pack a rain layer and a warm layer. Weather can switch fast, and ridge wind can chill you even when you’re moving.
Because Benguet mornings can feel extra crisp, this Cordillera cool-air camping guide is also useful for what to wear and how to stay comfortable in cool, damp conditions.
Reality check: Mt. Ulap is not “hard” in a macho way—it’s just longer. Your success here is pacing, snacks, and taking breaks before you feel wiped out.
First-Time Hiking Prep in the Philippines
Here’s the calm, practical prep that makes beginner hikes feel easier—especially in humid, changeable weather.
Best season and timing
Dry months are generally clearer and less muddy, which is friendlier for beginners. In rainy season, trails can get slick—especially limestone and rocky sections—so plan earlier starts and choose less technical routes. Before you leave, check rain and advisories on PAGASA.
Reality check: “Cloudy” can still mean UV and heat. Sun protection is not optional on exposed trails.
What to wear (comfort-first)
- Top: Breathable shirt (quick-dry is best in humidity).
- Bottoms: Quick-dry shorts or light pants; avoid heavy denim.
- Layer: Light jacket for Baguio/Benguet and exposed ridges in Cebu.
- Sun gear: Cap or hat, sunglasses, sunblock.
Footwear that actually helps
 Grip matters more than brand. Choose shoes or sandals with textured soles and stable footing. Avoid smooth soles—wet concrete, damp soil, and rocky steps are common on Philippine trails.
Reality check: If you’re slipping on the way up, the way down will be worse. Slow down, shorten your steps, and let others pass.
Daypack essentials (the simple baseline)
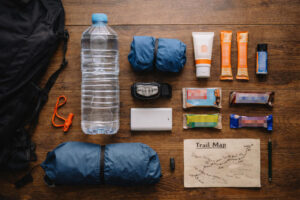 Water: 2L baseline for most beginner hikes (more for exposed, hot trails).
- Electrolytes: Packets or tablets—especially for sweaty days.
- Snacks: Something salty + something sweet (nuts, biscuits, bananas).
- Sunblock and insect repellent.
- Light rain jacket or poncho.
- Small first-aid: blister plasters, bandage, antiseptic wipe, pain reliever.
- Headlamp (or small flashlight), whistle, and power bank.
Pacing tips that keep it “no pressure”
- Talk-test pace: You should still be able to talk in short sentences.
- Micro-breaks: 20–30 seconds of breathing and water beats one long collapse later.
- Don’t race the climb: The goal is steady comfort, not speed.
- Fuel early: Small snacks before you feel hungry help keep your energy even.
Safety basics and etiquette
- Tell someone your plan (trail, start time, expected return).
- Respect cut-off times and local rules.
- If you hear thunder or see lightning, stop and prioritize getting to a safer area.
- Avoid hiking alone on unfamiliar trails—especially if guide rules are unclear.
- Leave No Trace: pack out trash, keep noise low, and stay on established paths.
If you want a quick emergency-readiness reference, keep it simple and practical: Philippine Red Cross.
Guide and Registration Expectations
In the Philippines, trail systems often involve local communities—so registration, environmental fees, and guide rules can vary trail to trail.
- Barangay registration: Common at jump-off points, especially for mountains. You may log your name, group size, and route.
- Environmental fees: Often collected to support trail upkeep and community management.
- Guides: Some easy trails are DIY-friendly, but guides may be mandatory on certain routes (like well-known traverses) or encouraged for safety and local support.
- Rules can change: Even if you read an old blog post, follow the on-site instructions and current policies.
Reality check: “Optional guide” doesn’t mean “no guide ever.” It can depend on day, weather, group size, and current local rules—so arrive with time and a flexible budget.
Mini Checklist for First-Time Hikers
Printer-friendly and short—tick this before you leave.
- ☐ Checked weather/advisories (PAGASA)
- ☐ Told someone my plan + expected return time
- ☐ Cash for registration/environmental fees + extra
- ☐ 2L water + electrolytes
- ☐ Snacks (salty + sweet)
- ☐ Sunblock, cap/hat, insect repellent
- ☐ Light rain jacket/poncho
- ☐ Shoes with grip (no smooth soles)
- ☐ Small first-aid + blister care
- ☐ Headlamp/flashlight + whistle
- ☐ Fully charged phone + power bank
- ☐ Asked about registration, guide rules, and cut-off time at jump-off
When you choose beginner hikes Philippines-style—early starts, steady pacing, and comfort-first prep—you get the best kind of trail day: the one that feels peaceful while you’re doing it, not just after you’re done.


