

If your Philippines itinerary keeps expanding—another island, another “quick side trip,” another early morning—this is where trips start feeling like a relay race. The base and day trips Philippines method is a calmer alternative: you choose a practical hub (your base), then explore nearby places as day trips that bring you back to the same bed. You spend less time checking in and out, and you reduce the number of days that can be broken by delays.
 This isn’t about traveling “slow” for the sake of it. It’s about planning around real Philippine conditions: long travel times, weather disruptions, crowd pressure on peak dates, and transport schedules that can shift. Always confirm schedules close to your travel dates—especially ferries, domestic flights, and shared vans—and build a plan that can bend without falling apart.
At-A-Glance: Base Plus Day Trips Philippines
- Core idea: one comfortable base, multiple day trips, fewer transfers.
- Best for: first-timers, families, mixed-energy groups, and anyone who wants more time on the ground.
- Main risks this reduces: lost sightseeing time on Transfer Days, missed connections, weather-based cancellations, and peak-week price spikes.
- Key planning tools: Transfer Day labeling, a realistic day-trip time threshold, and 1–2 Buffer Days.
- Reality Check: You can still do multiple regions—just do it with fewer “hard” moves and more flexible day trips.
Base And Day Trips Philippines: What This Method Means
The goal: fewer check-ins, more real time on the ground
Base plus day trips (also called a Hub And Spoke Itinerary Philippines approach) means you pick one base that’s practical to live from—food options, transport access, stable signal, and basic services—then you take day trips that return you to the same accommodation. The big win is predictability: one set of check-in rules, one luggage routine, and less risk of losing a full day to moving.
Reality Check: Day trips can still be long in the Philippines. The point isn’t to “pack more.” The point is to keep the stressful parts (packing, transfers, late arrivals) to a minimum.
When this method is not ideal (very remote islands that require overnight moves)
Some destinations simply require overnight moves—very remote islands, limited ferry days, or places where the last boat is early and the next one is uncertain. In these cases, the base method can still help: you can use it for the bigger region (a mainland hub) and accept that one remote extension will be a true Transfer Day block.
Reality Check: If your “remote add-on” depends on perfect seas or one specific ferry time, it’s safer to treat it as optional unless you can add buffers.
How The Base Method Works (Simple Steps)
Pick one base with the most reliable transport options
Your first base should be the place with the most dependable transport choices and the easiest logistics: frequent public transport, early tour pickups, and access to essentials. If you’re planning your first trip, it helps to pair this method with Philippines Travel Planning Guide For First-Timers so you don’t miss basics like transfer time buffers and booking windows.
Reality Check: A “cheap but isolated” base can cost more in the long run if you keep paying for private rides or get stuck during weather changes.
Build day trips around a realistic travel time threshold
Set a threshold before you start adding day trips. A practical rule for many travelers is: if the round-trip commute plus waiting time will regularly eat most of your daylight, it’s no longer a relaxed day trip—it’s a Transfer Day in disguise.
- For comfort-focused trips: keep most day trips within a manageable commute, with a clear “back to base” time.
- For energetic travelers: you can stretch, but avoid stacking multiple long days in a row.
Reality Check: In the Philippines, waiting time is part of travel time—traffic, boarding lines, and “next trip schedule” pauses are normal.
Keep 1 to 2 “free choice” days for rest or Plan B
Instead of filling every day with a fixed activity, reserve 1–2 days as “free choice.” These become your rest day, your laundry day, your crowd-avoidance day, or your weather backup day—without needing to cancel anything.
Reality Check: Free choice days are not “wasted.” They’re what keeps the trip from feeling fragile when plans shift.
How Many Bases To Choose For 7 Days 10 Days 14 Days
7 Days: 1 base if first-timer, 2 bases only if transfers are simple and short
For 7 days, one base is usually the safest choice, especially if you’re a first-timer. If you want two bases, keep the transfer simple: a short domestic flight or a straightforward bus ride, ideally without tight ferry connections.
Reality Check: Two bases in 7 days can quietly become three travel-heavy days once you count airport time, port waiting, and check-in windows.
10 Days: 2 bases for variety, avoid adding a third unless travel days are minimal
Ten days is a sweet spot for two bases: enough variety, but still enough time to settle into each place. Adding a third base can work only if each transfer is truly short and reliable—and you still keep at least one Buffer Day across the trip.
Reality Check: Your calendar may say “transfer + sunset,” but real conditions often turn that into “transfer + dinner + sleep.”
14 Days: 2 bases for comfort, 3 bases only with strong buffers and fewer long transfers
For 14 days, two bases still keeps life simple. Three bases can work if you commit to fewer long transfers, add buffers, and accept that not every base needs a full list of day trips. The goal is to protect your best days, not maximize pins on a map.
Reality Check: The more islands you add, the more your trip depends on transport timing and sea conditions. This is where buffers matter most.
Quick rule of thumb: count travel days first, then count sightseeing days
Before you choose the number of bases, label every Transfer Day on your calendar. Include early checkouts, port waits, airport time, and arrival recovery. Only after you see the true number of travel-heavy days should you count what’s left for actual exploring.
How To Spot “Too Much Moving” (Red Flags On Your Calendar)
Changing hotels every 1 to 2 nights
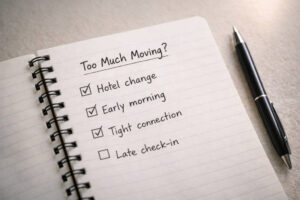 If you’re switching accommodations every 1–2 nights, you’re spending a big part of the trip packing, checking out, waiting, and checking in. In Philippine conditions, that often leads to missed meals, rushed sightseeing, and higher transport costs.
More than one big transfer every 3 days
Frequent big transfers (ferry + van + another ferry) create compounding risk. One late segment can break the rest of the day, and you may end up paying for expensive last-minute options.
Too many early mornings in a row
Early call times can be worth it—especially for calmer seas or cooler hikes—but stacking them can drain energy fast. If you see three to five early mornings in a row, build a recovery day or shorten one of your day trips.
Plans that depend on perfect timing (tight ferry connections, same-day island swaps)
Red flag phrases to watch for: “just catch the next boat,” “quick connection,” “we’ll be fine if traffic is light.” In the Philippines, tight connections are the first to break when weather changes, passenger volume spikes, or schedules shift.
Reality Check: Overplanning usually looks efficient on paper, then turns stressful when one delay forces you to renegotiate the whole chain.
Day Trip Vs Transfer Day (So You Don’t Confuse Them)
Day trip definition (return to the same bed)
 A day trip means you leave your base, explore, then return to the same accommodation. This is what keeps your logistics stable: you don’t carry your full luggage, and you don’t depend on check-in windows to end the day.
Transfer day definition (check out, move, check in)
A Transfer Day is a day where moving is the main activity: check out, commute, wait, arrive, check in, recover. It can still include a stop, but it should be planned like a travel-heavy day, not a full sightseeing day.
A practical time rule: if the commute drains the whole day, treat it like a transfer day
If the day trip requires very early departures, multiple rides, and a strict “last trip” deadline, treat it like a Transfer Day. This is also where it helps to understand how public transport really works, including terminals, queues, and schedule variability: Philippines Public Transport Guide.
Reality Check: Many travelers underestimate the “in-between time”: waiting for the van to fill, slow boarding, or traffic leaving town.
Buffer Day Planning (The Part People Skip)
Why buffers matter in the Philippines (traffic, weather, sea conditions, schedule changes)
Buffer Days protect your trip from common disruptions: heavy rain, rough seas (“maalon”), holiday traffic, delayed domestic flights, and ferry schedule adjustments. They’re also your recovery days after a big transfer or a sea tour.
To understand how seasons can affect rain and sea conditions, keep Philippines Weather Guide And Best Months handy, and check PAGASA Climate Of The Philippines when you’re planning around monsoon months.
Reality Check: Buffers feel optional until you need them. In Philippine travel, needing them is common enough that they should be part of the default plan.
Simple buffer rule if you want less stress
A simple rule many planners use: add at least one Buffer Day per week of travel, then place it where it can rescue the most important plans. If your trip includes sea crossings, add an extra half-day to one day buffer around those segments when possible.
Where to place buffers (after arrival, before flights home, after sea tours)
- After arrival: helps you recover from long travel and adjust if you arrive late.
- Before your flight home: protects against last-minute transport problems.
- After sea tours or ferries: gives you room if seas force a reschedule.
Choosing A Good Base In The Philippines
What to look for (food, clinics, ATMs, transport options, early tour pickups)
 A good base is boring in the best way: it has food options you can rely on, easy transport access, ATMs, and a clinic or pharmacy within reach. It also works with tour logistics—some pick-ups start early, and the wrong base can add long, pricey transfers just to reach the meeting point.
Comfort vs budget base choices (walkability, aircon, stable signal, safe tricycle zones)
Budget bases can work well, but check comfort basics that affect the whole trip: walkability (especially at night), air conditioning during hot months, stable signal for confirmations, and safe tricycle zones for short rides. If you’re mixing day trips and public transport, prioritize ease and safety with Travel Safety Tips For The Philippines in mind.
Reality Check: Saving a little per night can cost more if you keep paying for rides because the base is far from terminals and food.
How to choose between two bases (pick the one that reduces total transfer time)
If you’re torn between two bases, choose the one that reduces total transfer time across the whole itinerary. A slightly less “scenic” base that is closer to terminals or has more frequent transport options can give you more actual travel time where it matters: on your day trips.
Day Trips That Fit The Method (So You Don’t Turn Them Into Mini-Transfers)
Choose day trips that match your threshold and your group’s energy. This is also a good moment to keep activities “beginner-friendly” if your schedule is tight—short hikes, easy waterfalls, gentle paddling, or view spots that don’t require a full-day recovery. For practical, safety-first ideas, see Beginner Safe Adventure Travel In The Philippines and, if you want a hike that won’t dominate the entire day, browse Beginner Hikes In The Philippines.
Reality Check: A day trip that looks “near” on a map can still be long if roads are slow or if you need multiple rides.
A Simple Example Route (Illustration Only, Easy To Copy)
Example for 7 days with 1 base plus 3 to 4 day trips plus 1 buffer
Pattern: Arrive and settle (Transfer Day), 3–4 day trips with one rest/Buffer Day in the middle, then a final easy day that keeps you close to your base before you leave. The point is to make most days “return to base” days, with one flexible slot that can absorb weather or crowds.
Example for 10 days with 2 bases plus 1 buffer day in each base
Pattern: Base A (4–5 nights) with 2–3 day trips + 1 Buffer Day, then one clear Transfer Day to Base B (4–5 nights) with 2–3 day trips + 1 Buffer Day. This is a Hub And Spoke Itinerary Philippines style that gives variety without turning every other day into packing day.
Example for 14 days with 2 bases plus 2 buffers and flexible day trip slots
Pattern: Base A (6–7 nights) with 3–4 day trips + 1 Buffer Day, then Transfer Day, then Base B (6–7 nights) with 3–4 day trips + 1 Buffer Day. Keep 1–2 “free choice” days across the whole trip for weather shifts, sold-out tours, or rest.
Reality Check: These are patterns, not promises. Always confirm ferry and flight schedules close to travel dates, and expect holiday crowds to change travel times.
What To Do When Plans Break (Weather, Delays, Sold Out Tours)
Plan A Plan B Plan C checklist
- Plan A: Your must-do day trip with the best timing (often earlier in the trip).
- Plan B: A nearby alternative that does not require a ferry or strict schedule (museum, town food crawl, short hike, cafe + rest, inland viewpoint).
- Plan C: A full reset day: laundry, sleep, rebooking, and a low-effort activity close to your base.
Reality Check: In the Philippines, “sold out” and “moved schedule” are normal during peak periods. A Base Plus Day Trips Philippines plan works because it gives you room to swap days.
Rebooking habits that reduce stress (confirm windows, book key items, stay flexible elsewhere)
Book the items that are hardest to replace (limited tours, key hotels in peak weeks, critical transport legs), then keep everything else flexible. Confirm pickup windows and meeting points the day before. If you’re unsure about safety conditions—especially seas, late-night transfers, or isolated pickups—use Travel Safety Tips For The Philippines as a checklist.
How To Keep Costs Predictable (Transport And Accommodation)
The base method helps control costs because you reduce the number of long transfers (often the most expensive and unpredictable part). A few practical habits keep spending steady:
- Choose bases near terminals or common pickup routes to avoid repeated private rides.
- On peak weeks, book accommodations earlier and keep your day trips flexible.
- Label Transfer Days so you don’t accidentally pay for “two transports in one day.”
- For public transport realities and fare planning, revisit Philippines Public Transport Guide.
Reality Check: The fastest option (private car, last-minute flight) is usually the most expensive. The base approach reduces how often you feel forced into those choices.
Optional Add-On For Slower Travel
If your group enjoys quieter nights and you’re staying longer in one base, a simple overnight nature add-on can fit the method—only if it doesn’t create a chain of tight connections. If you’re curious about beginner-friendly pacing and logistics, Camping In The Philippines Beginners Guide can help you decide what’s realistic for your comfort level and gear.
FAQ
What does Base Plus Day Trips mean in the Philippines?
It means choosing one main base (your hub) and doing day trips that return you to the same accommodation, instead of moving hotels every few nights. This reduces Transfer Days and makes your schedule more resilient to delays and weather.
How does the base method work step by step?
Pick a base with reliable transport and essentials, set a realistic day-trip time threshold, block Transfer Days clearly, then reserve 1–2 free choice days as Buffer Days. Confirm schedules close to travel dates and keep Plan B options nearby.
How many bases should I choose for 7 days, 10 days, and 14 days?
For 7 days, usually 1 base (2 only if transfers are simple). For 10 days, usually 2 bases. For 14 days, often 2 bases for comfort, with 3 bases only if you have strong buffers and minimal long transfers.
How do I spot too much moving before I book?
Watch for hotel changes every 1–2 nights, more than one big transfer every 3 days, too many early mornings in a row, and plans that require perfect timing like tight ferry connections and same-day island swaps.
What is buffer day planning and what is a simple rule?
A Buffer Day is a flexible day that can absorb delays, weather changes, and crowd pressure. A simple rule is to add at least one Buffer Day per week, then place it where it protects your most important plans.
What should I do when weather or delays break the plan?
Use a Plan A/Plan B/Plan C approach: keep your must-do early, have a nearby alternative that doesn’t depend on ferries or strict timing, and keep one reset day for rest and rebooking. Confirm advisories and schedules close to the day.
How can I keep costs predictable with this method?
Reduce the number of long transfers, choose bases near transport hubs, book peak-week accommodations earlier, and keep day trips flexible. This lowers the chance you’ll need expensive last-minute transport.
For official general travel references, you can check Department Of Tourism Philippines for broad guidance and announcements. For more planning-first reads, explore Tips And Inspiration.


